5 Things to Do Once You've Created a Martide Account

If you've just created an account with Martide - "Welcome!" We’re truly happy that as a shipowner or manager you’ve decided to simplify your maritime recruitment processes and crewing systems by joining us!
But if you’ve created a Martide account and are wondering what to do next, read on as we take you through simple five steps to get you up and running.
First of all, log into your Martide account. The very first page you see is your Dashboard. It looks like this:

Your Dashboard lets you see at a glance everything that's happening, in real-time, with the number of crew you have onboard, up and coming crew changes, and birthdays happening in the next 30 days (send a friendly greeting and help boost crew retention!)
Also in your Dashboard, you'll see a list of your vessels, your officer matrix, and your vessel teams.
It's all exciting stuff - so let's get started!
5 things to do when you've created your Martide account
1. Update your company profile
One of the first things you’ll want to do is to add your shipping company’s information to your profile. Here’s how to do that.
Click on Settings under your profile icon and then on Company Profile.
The next page you see looks like this:

On this page you can personalize your profile by uploading your company logo (in the box with the camera icon). You can also add your company name and website address, the year your company was founded, your contact details, and how many employees you have ashore.
Note: to edit any section, click the little blue pen icon - see above.
Scroll down the page and you will see these sections:

This is where you can enter your About Us info, and add your clients and team members. To enter information, click the blue + signs. You can add multiple entries.
Carry on down the page and you will see these sections:

Here you can view/add your office and billing addresses and contracts. Note that the little red padlock icon means that this information is kept private.
Finally at the bottom of the page, you will see:

Now you can upload your documents: For example copies of your ISO 9001, minimum requirements for seafarers to work on ships, conditions of employment, and compliance and enforcement.
When you've finished, click on Page Preview at the top, you'll be taken to this page where you can see your entered info:

Congratulations - you’ve completed your profile. Now we’ll take a look at how to add a vessel to start building your online fleet as part of streamlining your maritime recruitment and crewing systems.
2. Create a vessel
Click on Fleet in the menu on the left hand side of the page. You will see a page that looks like this:

On this page you can add a new vessel, filter existing vessels, see the name of your vessel, her IMO, number of crew, the Master and Chief Engineer, the vessel status, her flag and a list of the crew onboard.
To see the names of the crew, click on the list icon under Crew List.
Click the + Add Vessel button at the top right of the page. You’ll then see this page:

In the Vessel logo and details sections you can upload your logo or a photo of the vessel, enter the vessel’s name and previous name(s), select the manager's flag from the drop down box, enter the IMO and MMSI numbers, and the management's start and end dates.
Scroll down the page and you will see the Vessel contact section:

Here you can select the Crew Operator and Technical Superintendent, and enter the contact email and phone number.
Carry on down the page and you will see the Emergency contact, Wage scale and Vessel specifications sections:

Here you can add a note about the emergency contact, select your Wage Scale, and enter the vessel’s specs including vessel type, ECDIS, speed, flag, trading pattern, special equipment, year built, AIS name and AIS class, call sign and cargo.
Below that is another section where you can enter the vessel's dimensions.
You can also upload the vessel’s documents and select your billing details:

That’s it - you’ve successfully added a vessel. Now let’s look at how to create a job vacancy.
3. Create a vacancy
Click Assignments in the menu on the left hand side of the screen. That will take you to your Assignments page:

On this page you can:
Create a new Assignment, see your vessels, the rank, how many candidates have applied, if any candidates are ex-crew, how many have been hired, the change over date, and status.
You can filter Assignments by clicking the buttons at the top of the page and you can also sort them alphabetically or numerically by clicking the pyramid icon. Click on an Assignment to view its details.
You can also change the Status of an Assignment to Open or Closed, edit an open Assignment by clicking the pen icon to the far right of an Assignment, and delete an Assignment by clicking the trash can icon to the far right of an Assignment.
To create a new vacancy click the + Add assignment button on the top right. You will see this page. (This page is quite long so we'll look at it in sections):

In this section you can add the basic information for this Assignment such as selecting whether the job is off shore or on shore, selecting the vessel name or IMO from the drop down box, and selecting the rank you are hiring for.
Scroll down the page and you will see:

Now you can enter the vessel's trading area, the crew change date, and the job listing expiry date. You will also need to select the relevant Candidate Pipeline and Crew Slot.
Here's where you’ll also add your Budget. Carry on down the page and you'll see:

Enter the visas required and the contract length as per your requirements. Next you'll see:

Enter the experience you want the candidate to have for this particular rank and add a job description at the bottom. Click Next when you're done. That will take you to this screen:

Now you'll need to add the documents you need this candidate to hold. To read more about Required Documents, click here.
Your maritime recruitment process is taking shape and now it’s time to advertise your vacancy. You will stay on the same screen and it’s not complicated to do but you can read about it in more detail in this step-by-step guide here.
Advertising your vacancy
When you click Next in the Required Documents screen you will be taken to the Advertising section:

As you can see from the image above, you have two options:
- Public: After posting a public position, your basic requirements will be displayed on Martide’s job page. We’ll look for candidates for your position by checking our database. Candidates can also apply directly.
- Private: This lets you send your vacancies to manning agents. Unlike public vacancies, agents will be able to see all the information you included in your Data Template.
If you want to send your vacancies to manning agents, it's time to decide who. (If you don’t wish to outsource to a manning agency, skip ahead to step 5.)
4. Choose your manning agent(s)
Scroll further down the page and you will see:

Note, that if you want to use one or more of our manning agents, you will need to select them first so that they show up on this page. To do that, click Settings under your profile icon and then on Manning Agents.
You’ll see a page that looks like this:

Use the buttons to turn on or off manning agents depending which country you want to recruit seafarers from. It’s as easy as that but if you do want to read more about how to choose a manning agent to assist in your maritime recruitment, check out this guide here.
5. See who's applied for your vacancies
To see applicants for your vacancies, you need to go back to the Assignments page:

Here you can see your vacancies (Assignments): which vessels they are on and the rank you are looking for You can also see how many candidates have applied, if any candidates are ex-crew, how many have been hired, the change over date, and the vacancy (Assignment) status.
You can also delve deeper into your vacancies, view the stages of the recruitment Pipeline and see which candidates are at which stages. To do this click on the name of a vessel:

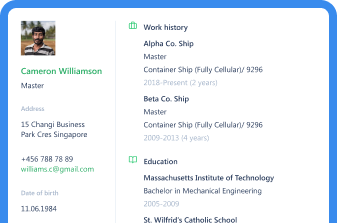
To learn more about a candidate, click on their name in the panel on the right hand side of the screen. That will take you to their profile.
Meanwhile to read more about tracking your candidates and Pipelines, click here.
And so there you have it. Five steps for getting started when you’ve opened a Martide account. Five steps to creating a truly streamlined and integrated maritime recruitment and crewing system! We hope you’ve found this guide helpful but if you have any other questions, please don’t hesitate to contact us at support@martide.com
Or why not take a look at the rest of the articles on our dedicated support website. There you’ll find guides for shipowners, recruitment officers, crew managers and manning agents, as well as for seafarers.
This blog post was originally published in 2019 and updated in May 2020 and on June 22nd 2021 to reflect changes in Martide's design and functionality.

Eve Church
Eve is Martide's content writer, publishing regular posts on everything from our maritime recruitment and crew planning software to life at sea. Eve has been writing professionally for more than two decades, crafting everything from SEO-focused blog posts and website landing pages to magazine articles and corporate whitepapers.
UK