How to Make Crew Change Overs Easier Than Ever Before

Martide knows maritime crew management software AND we know that as crew change dates creep ever closer, filling certain positions can be a great source of stress for many Crew Managers and Manning Agents. Maybe you've ever wondered why, when you’re planning crew, there always seems to be certain ranks that you struggle to find seafarers for.
Not only that but with so many different components that make up every crew change, from making sure dates align to booking travel and so forth, simplifying your crew planning system and process is virtually a must.
And that’s why Martide’s maritime crew management software includes a Crew Changes feature. Our aim in designing and building this function is to simplify what can be a complex issue for many small to medium sized shipping companies.
PS, why not follow us on Facebook, LinkedIn and Twitter / X!?
We're great believers in using technology to make life easier - which is why Martide was founded in the first place. And whether you already have a Martide account but aren't sure what the Crew Changes page is all about, or you're looking for a better way to run your crew planning operations, this blog post is for you.
And the good news is that the Crew Changes feature is easy to use (even if you're not the biggest fan of technology!) So in this post we’re going to walk you through how to use it to your advantage.
Read more:How to Simplify Your Ship Crew Management & Planning
Martide can make crew change quicker and easier. Here's how.
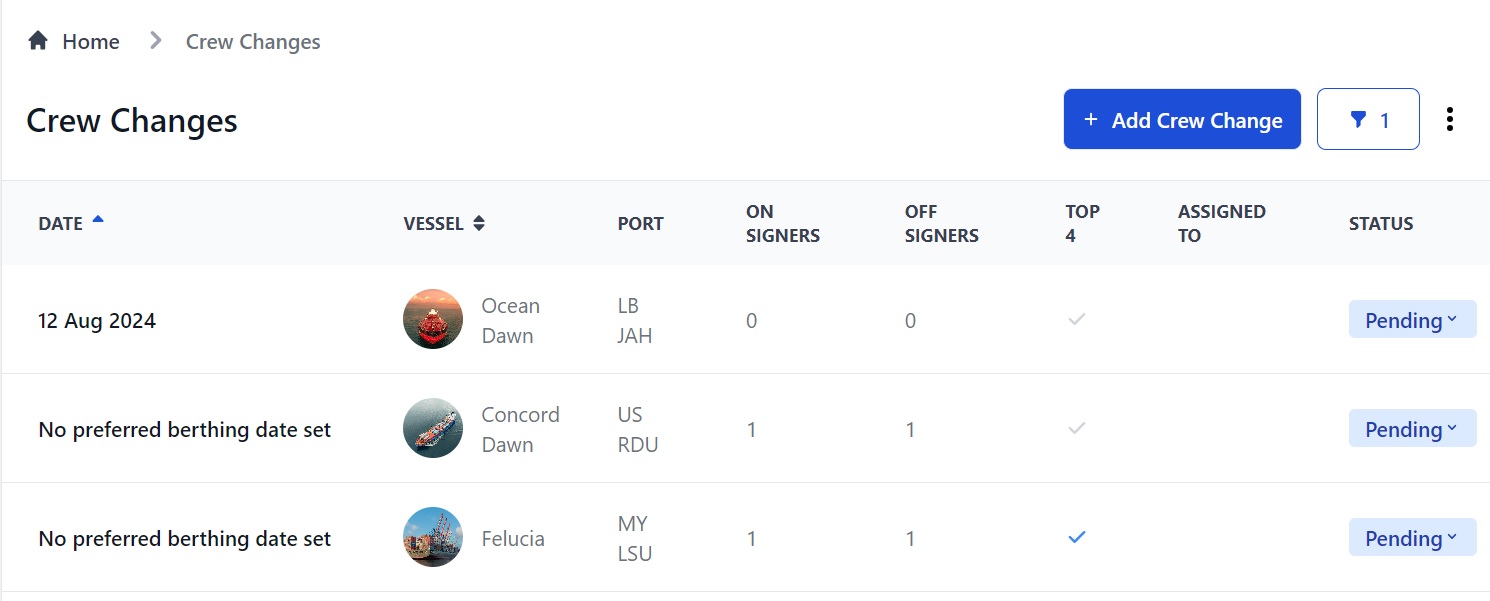
Log in to your Martide account. In the menu on the left hand side you will see Crew Changes. Click on it and you will see a page that looks like this:

This is the main Crew Changes page which shows you at a glance where you stand with your vessels and their crew change over dates.
As you can see from the image above, you can see the change over date, if one has been set, the name of the vessel, the port, and how many crew members you will have off signing on that date, and how many who will be on signing.
Read more: 5 Reasons Why Travel Agents Should Create a Martide Account
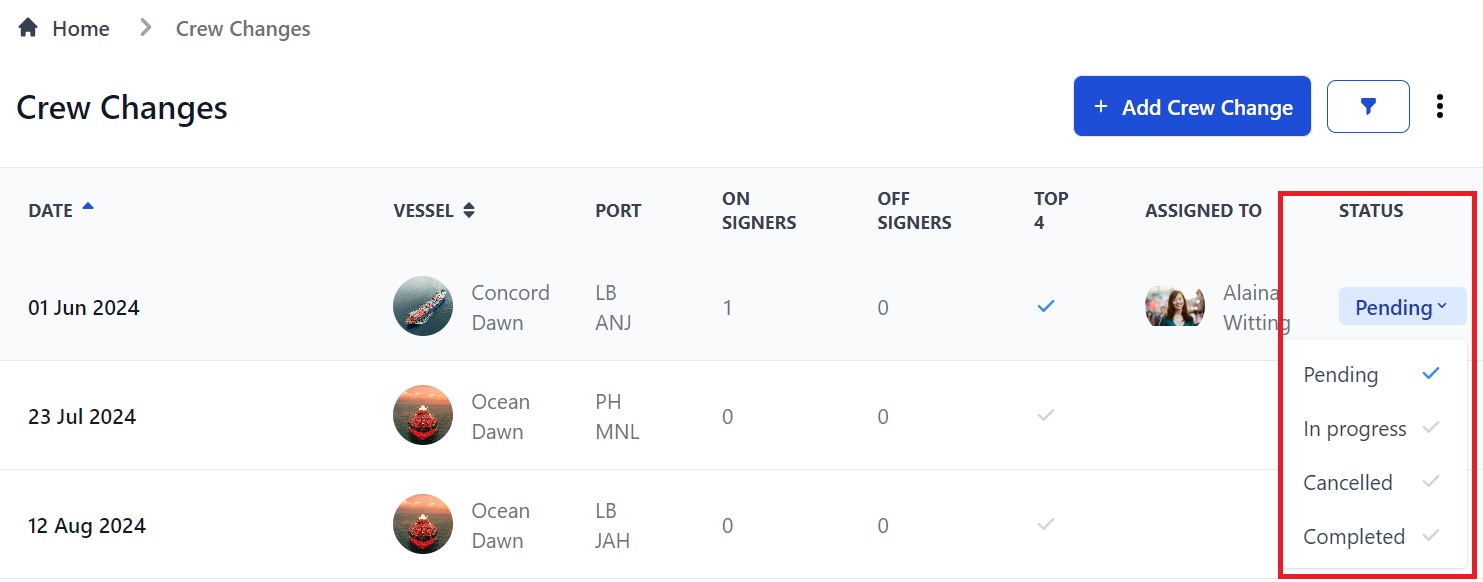
You can also see whether any of the Top 4 ranks (Master, Chief Officer, Chief Engineer and Second Officer) are part of the crew change, which of your team the crew change has been assigned to, and the status of the change over - which will either be In Progress, Pending, Canceled or Completed.

To break that all down into bite sized chunks, on this page you can:
- See your change over dates, vessels, the port, number of on and off signers, if any of the changing crew are Top 4, who the crew change has been assigned to, and the crew change status.
- Add a new crew change.
- Filter your crew changes by Vessel, Change Over Dates, Assigned User, Status or Port by clicking the funnel icon at the top.
- List your crew changes by A-Z or Z-A or by first to last date by clicking the little pyramid icon next to Change Over Date or Vessel.
- Change the status of a crew change to In Progress, Pending, Canceled or Completed by selecting the status from the drop down box. (See the image above.)
- Download crew change and/or flight information into an Excel spreadsheet by clicking the 3 dots at the top.
How to add a new Crew Change
It’s as easy as ABC to add a new Crew Change. Simply click the blue button at the top of the pages that says Add Crew Change. That will show you a pop-up box that looks like this:
Your drop down list will show you the names of all of your vessels - providing, of course, that you’ve entered them into Martide's system.
(You can read all about adding your vessels on our dedicated support website here.)
You can also select the airport that the on-signers will be arriving into and the port that the crew change is taking place at. You can also enter the berthing date.
When you’ve entered the information, click the Create button. That will take you to a new Crew Change page. It looks like this:
On this page you can now add additional details about the crew change and perform other actions:
- Change the crew change status from pending to In Progress, Canceled or Completed.
- Copy the URL to send it to a Port Agent or paste it elsewhere.
- Assign the crew change to yourself or someone else.
- See the information about the crew change that you entered into the pop-up box. You can edit this if needed.
- Enter the estimated berthing and departure dates and times.
- Add another port, airport and berthing date. This is useful if you want to add a 'Plan B' in the event that you need to conduct the crew change at a different port on your vessel’s route.
- Add your on- and off-signers.
That's quite a lot to take in, we know, but the design is simple and the end result will be faster, more organized crew changes, we promise!
How to add on and off signers
It’s time to select your crew members who are signing on and off. Scroll down to the On-Signers section below the Ports section.
In the On signers section click Add on-signer. This opens a pop-up box showing all available seafarers:
In this box you can:
- Look for a seafarer using the Search bar.
- See available seafarers, their rank and their status.
- Check the box next to the seafarer who is on signing and click the blue Add to on signers button. They will now appear on the main screen.
Next go to the Off-signers section and click Add off-signer. That will open a pop-up box with the seafarers who are onboard the vessel and who can be signed off. It works in the same way as the on-signers section - simply check the seafarer you want to disembark. When you have added your on- and off-signers, the Crew Change page looks like this:
The off-signers section looks the same as the on-signers and here you can:
- See the seafarer, their rank, the airport they're coming from, if you have requested that they confirm the crew change, if they have working gear, if their tickets have been issued, and whether their documents are in order.
- The icons are: document validation, visa, flights and contract. When the icons are green, it means documents have been validated, visa has been issued, flights have been booked and the contract has been agreed.
- Other colors mean: gray - not done/still waiting. Blue - pending. Orange - error or missing document. Black - not required.
- Click the 3 dots at the end of the row to upload missing documents. See the image below.
- Send them an email by clicking the arrow.
- Add a note to an on- or off-signing list by clicking the Add Notebutton. The note will appear at the bottom of the list. You can edit or delete the note.
How to view a crew change over’s information
Click on the name of the port on the overview page:
That will take you to this page:
On this page there are 5 sections containing the following information:
- Ports: The name of the port(s) and airport(s), berthing and departure dates, length of port stay and estimated total costs.
- Port Agent: The name, email, phone number and address of the agent. You can enter and edit this information here.
- On-signers: The names, arrival and departure airports, target times and dates, and visas for each on-signing seafarer. Add your seafarer’s travel arrangements here. You can also send them an email. See below for how to add travel.
- Off-signers: This is the same as the on-signers.
- Costs: The expenses for both on- and off-signers including for flights, hotels, agency services, transport, immigration formalities and other. You can enter the expenses here.
How to add a seafarer’s travel arrangements
Martide’s maritime crew management software also makes it easy to arrange travel for your on- and off-signing seafarers. Go back to the On- or Off-signers sections and click the 3 dots next to the seafarer you want to add travel for then click Add Trip:
That will open a drop-down menu that looks like this:
Here you can:
- Click on the icons to add airports, times and dates and required visa.
- Click the 3 dots to add local travel, manually add flights, and hotels.
- Check the box next to the port or next to one or more seafarers to request their confirmation and/or to request flights from a travel agent. Requesting confirmation sends a notification to the seafarer via Martide's app asking them to review and confirm the flights. This means you don't have to call or email multiple seafarers.
For example, let’s say that you want to add a taxi ride for a seafarer, click Add local travel and you will see this:
Now all you need to do is to enter the journey's information and upload an eTicket of you have one. You will then see this:
When you want to add flights and hotels, this works in exactly the same way.
How to view an seafarer’s change over information
Click on a seafarer's name in the column on the left. You will go to their individual crew change information:
On this page there are 5 sections containing the following information:
- Personal Info: The seafarer's name, age, rank, location, home airport, date of birth, gender and nationality.
- Documents: Type of document, number, country of issue, issue and expiry dates, and copies of uploaded documents. You can download a copy of the document here.
- Ports: The port, arrival airport, berthing and departure times and dates, length of port stay and estimated costs.
- Travel: The travel arrangements that you booked for the seafarer on the Ports page.
- Working Gear: The type and size of working gear that has been ordered for that seafarer and if it has been received. Read more about Working Gear here.
How to filter your crew changes
We know that if you've got a lot of vessels in your fleet, you need a way to sort them quickly and efficiently so you can find exactly the information you're looking for.
To do this, go back to the main Crew Changes page and click the funnel icon at the top of the page:
This opens a side panel where you can filter crew changes by: Vessels, Change Over From and To Dates, Assigned User, Status and Port:
And that is how to effectively and efficiently manage your crew changes when you’re using Martide’s maritime recruitment and crew planning software solution!
If you would like to read a briefer step by step guide to the Crew Change feature, you can find that here on our dedicated Support website.
You will also find a whole range of guides there for Crew Managers and Manning Agents which will walk you through everything from our main functions to some of our lesser known, but still essential, features to our main pages.
Want to learn how to quickly and easily change the abbreviations for seafarer ranks that we use by default to the ones your shipping company uses? No problem. Interested in finding out how to use Data Templates? We have you covered.
Want to learn more about creating a job vacancy so you can get those seafarer jobs filled quickly? Yep, our Support site will help. (By the way, it is absolutely free for Crew Managers and Manning Agents to create a job advert on Martide.)
If you’d like to browse all of our help guides for Crew Managers, Recruitment Officers, Manning Agents and seafarers you can do that here.
Meanwhile, if you’d like to find out more about howMartide’s maritime crew management softwarecan help your company streamline your maritime recruitment and crew planning operations, please contact ushere toarrange your free demo.
This blog post was originally published on May 27th 2020 and last updated to reflect changes to the Crew Changes feature on August 8th 2024.

Eve Church
Eve is Martide's content writer, publishing regular posts on everything from our maritime recruitment and crew planning software to life at sea. Eve has been writing professionally for more than two decades, crafting everything from SEO-focused blog posts and website landing pages to magazine articles and corporate whitepapers.
UK

is the only site for maritime jobs


