How to Simplify Seafarer Planning with a Crewing System
If you’re a small to mid-sized shipowner or manager, you know as well as we do that planning crew for your vessels can be the root cause of quite a few headaches. And those headaches are made even worse if you don't have a solid crewing system in place to ensure a successful change over.
That’s why at Martide we’ve built a feature into our maritime recruitment and crew planning software that aims to take the stress out of managing and scheduling your crew by giving you the ability to see exactly who is on your vessels at any given moment, and who is lined up to sign on and off.
This feature is called Planning (no surprise there!) and as its name suggests, this function does exactly what it says on the tin.
In this blog post we’re going to take a closer look at the Planning feature and walk you through using it step by step so that you can see exactly how it works and what it can do to make life in your department easier.
Read more: How to Ensure Your Employees Adopt Your Crewing System
This article should also come in handy if you already have a Martide account, are just getting started, and you want to know exactly how to use and understand this aspect of our maritime recruitment and crew planning system.
So let’s get started.
What is Martide's maritime crew planning system?
Our Planning feature has two aspects: it lets you plan both Vessels and Seafarers which gives you a 360 degree view of everything that’s happening on your ships and with your people.
Please note that to use Planning you will need to have two browser tabs open so that you can have both the Vessels page and the Seafarers page open at the same time.

But first of all you’ll need to know where to find Planning in our crewing system platform.
So, log into your Martide account and click on Planning in the menu on the left hand side of the screen. You will be taken to a page that looks like the image below:
(Note the Vessels and Seafarers tabs at the top of the page in the red box. We are currently on the Vessels page.)
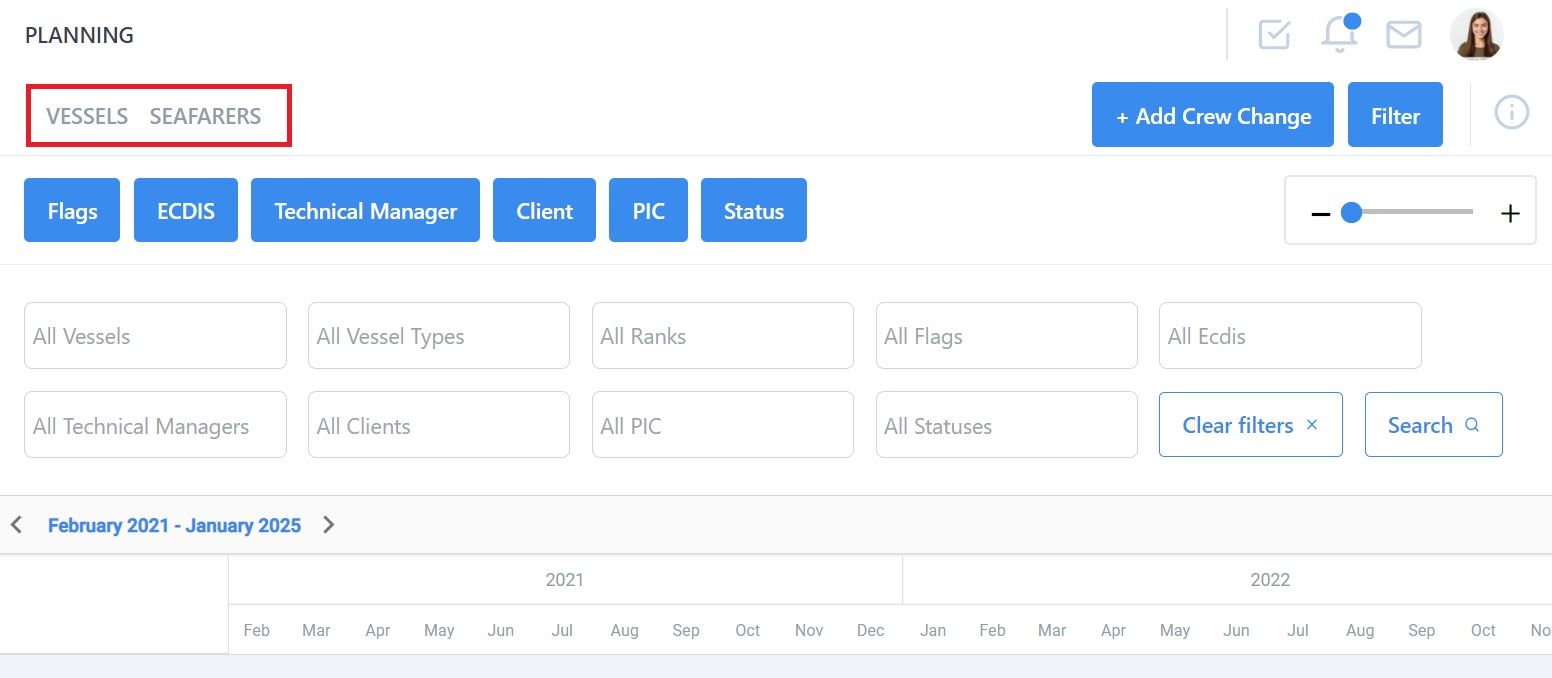
This page shows you who is on your vessels and it gives you easy-to-read, visual data so that your future ship crew management and planning is much easier.
Take a look at the above image. On this page you can:
- Search for your vessels using the dropdown boxes under All Vessels, All Vessel Types, All Ranks, All Flags, All ECDIS, All Technical Managers, All Clients, All PIC (Person in Charge), and All Statuses.
- Filter your search by Flags, ECDIS, Technical Manager, Client, PIC, and Status.
- Remove any of the filters by clicking on the blue box named for that filter at the top of the page.
- Remove all filters by clicking the blue Filter button at the top right of the page. This has the benefit of making the calendar bigger and easier to read.
- View the calendar and see the current status of your chosen vessel at a glance.
- Make the calendar larger and smaller by clicking on the - and + bar on the top right or make it fill the screen by removing all filters.
- Click the 'i' icon on the top right to see the color codes for the calendar.
You can also add a new crew change on this page - we added this so you can take care of planning and crew changes without having to leave this page. In addition you can also create an Assignment and convert a draft embarkation plan to an Assignment.
That's quite a lot to take in, we know, so we'll go through all of this in more detail one by one below.
How to use Planning on the Vessels page
To view a vessel and her crew click on any configuration of the boxes called All Vessels, All Vessel Types, All Ranks, All Flags, All ECDIS, All Technical Managers, All Clients, All PIC, and All Statuses.
Each box has a dropdown menu. For example, we have clicked on All Vessels and this will bring up a list of all of your vessels in Martide’s system.
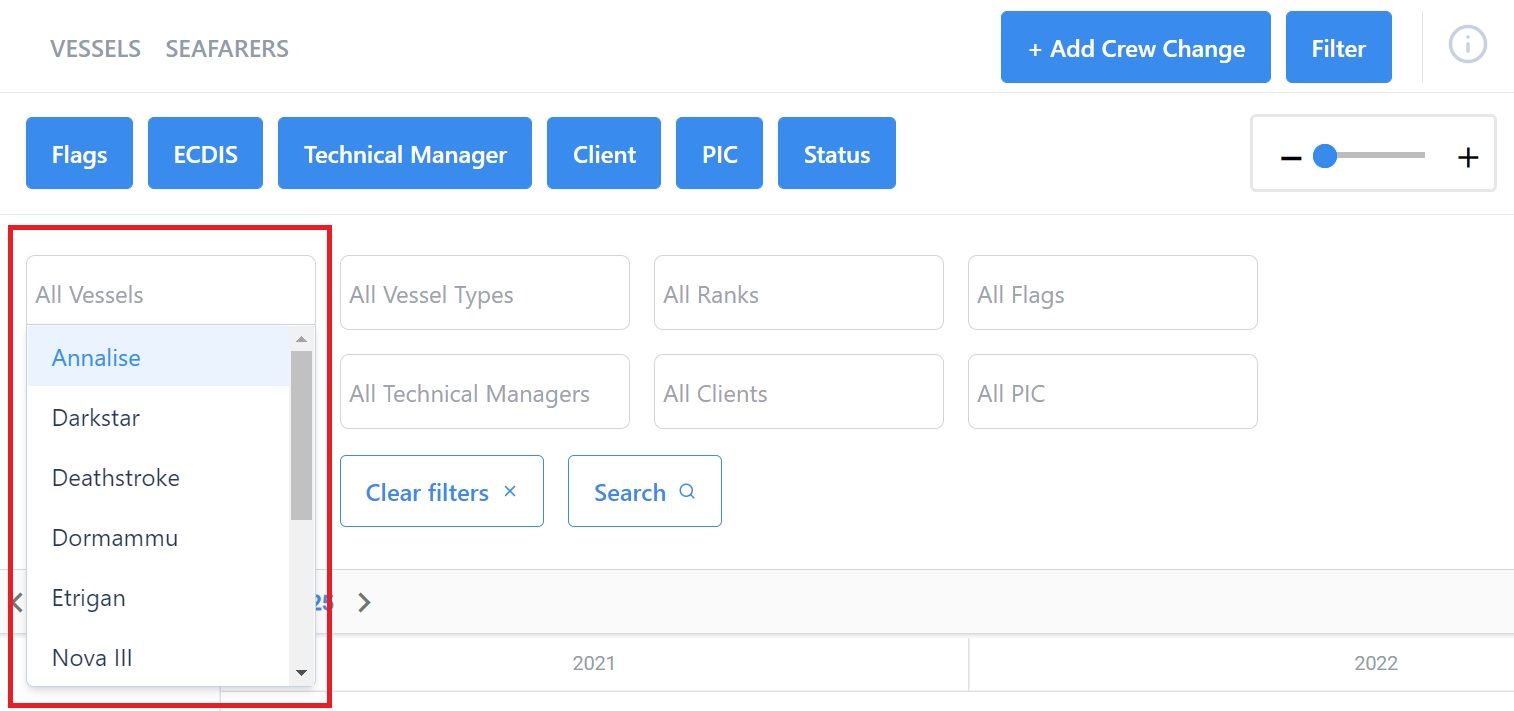
We want to see the crew plan for our (fictional) vessel called Deathstroke so we:
- Click on All Vessels and select Deathstroke.
- Click the Search button.
- lick the Filter button to close the filters and expand the calendar.
Now we can see Deathstroke's crew plan in the calendar below:
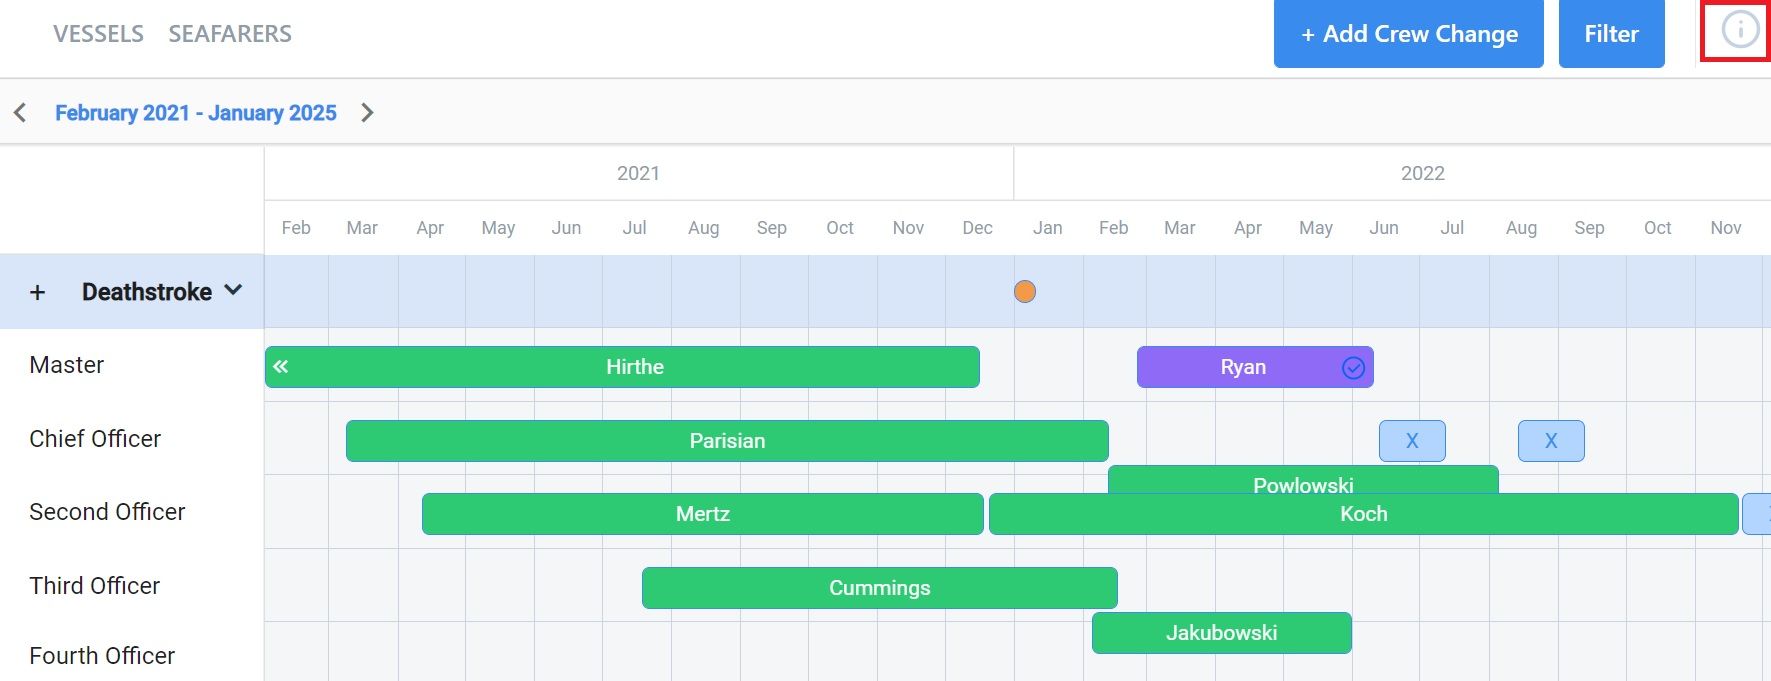
As you can see, this aspect of crew planning is made super efficient thanks to the clear design and layout of the calendar as well as the color coding. And here you can:
- See which seafarers of any given rank are onboard at the moment.
- See who is lined up to replace the current seafarer onboard.
- Click the 'i' icon in the top right corner to see what the color coded status of a seafarer is (see section below). The statuses are: Completed, Onboard, Hired, Assignment, Draft or Don’t Need Replacement, Warning and Approved.
- Scroll down to see all of your ranks on that vessel.
- Scroll across to see future dates.
- Create an Assignment and convert a draft embarkation plan into an Assignment.
For example:

If you take a look at the image above you can:
- See that Master Bechtelar is currently onboard (green) and disembarking in the middle of January. Master Gulgowski came onboard in January and will disembark at the end of June. Meanwhile Master Schowalter is an Assignment (blue) and will embark at the end of January.
- See that Chief Officer McCullough is onboard from June to the end of November and will be replaced by Chief Officer Gutmann.
- Click on a seafarer’s name to see their Embarkation Details. That will open a pop-up box that looks like this:
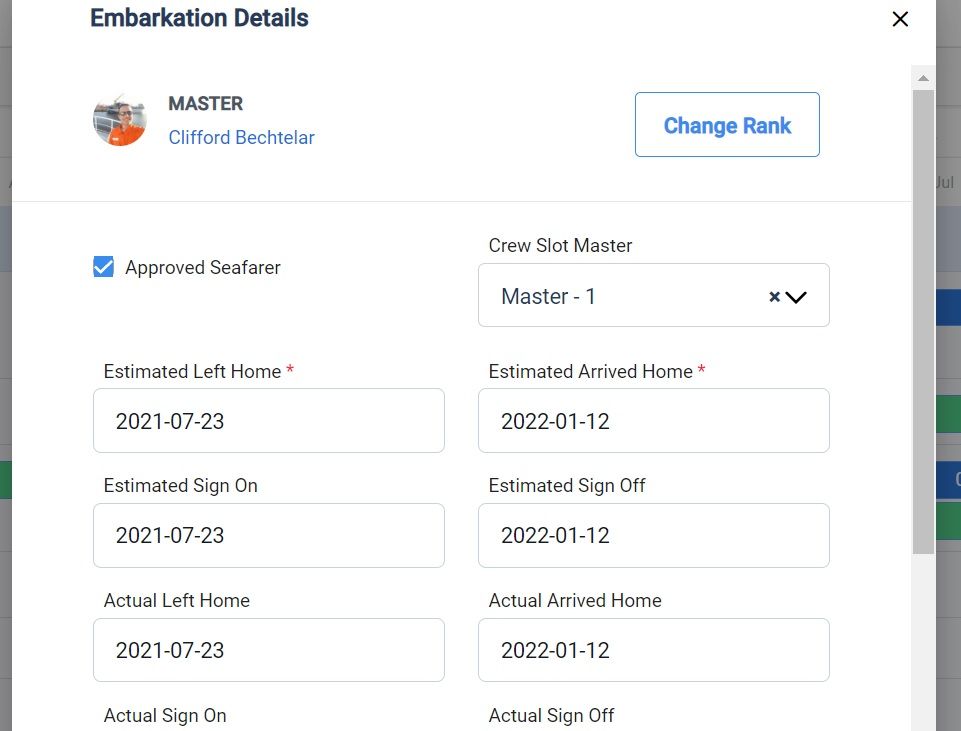
This is where you can:
- Enter your seafarer’s estimated left and arrived home dates, estimated sign-on and sign-off dates, actual left and arrived home dates, and actual sign-on and sign-off dates.
- Click the check-box if they are an approved seafarer.
- Change their rank by clicking the Change Rank button.
- Add notes about the seafarer.
- Cancel or save your changes and delete the embarkation if needed.
We know that, as a shipowner or operator, you have masses of data to deal with: your vessels, your different ranks, your seafarers onboard, your seafarers that are waiting to be signed on, your seafarers that are waiting to be signed off, your candidates for open vacancies...the list goes on.
And when you have so much data it can be hard to find exactly what you’re looking for.
And that’s where Martide’s crew planning filters can save the day (and save you countless hours and plenty of stress!)
Using filters to make crew management easier
We’re still on the Vessels page and now we’re going to tell you how to easily search for your vessels so you can see who exactly is onboard and who is waiting to embark.
That way you’ll be able to easily see if you have any gaps that need to be filled - and then use Martide’s maritime recruitment platform to find suitable candidates.
On the Vessels page, the default settings for searching are All Vessels, All Vessel Types, All Ranks, All Flags, All ECDIS, All Technical Managers, All Clients, All PIC (Person in Charge) and All Statuses.
Read more: The Beginner's Guide to Crewing System Software
You can also filter your search results by Flags, ECDIS, Technical Manager, Client, PIC (Person in Charge) and Status, or by any combination of these.
You can also enter more than one search option from each drop down box. In our example below you can see we’re searching chemical tankers and car carriers.
Here’s how to use filters:
To include all filter options, select the relevant vessel, rank, flag, ECDIS etc. from the drop down boxes under All Vessels, All Vessel Types, All Ranks, All Flags, All ECDIS, All Technical Managers, All Clients, All PIC (Person in Charge), and All Statuses.
For example:
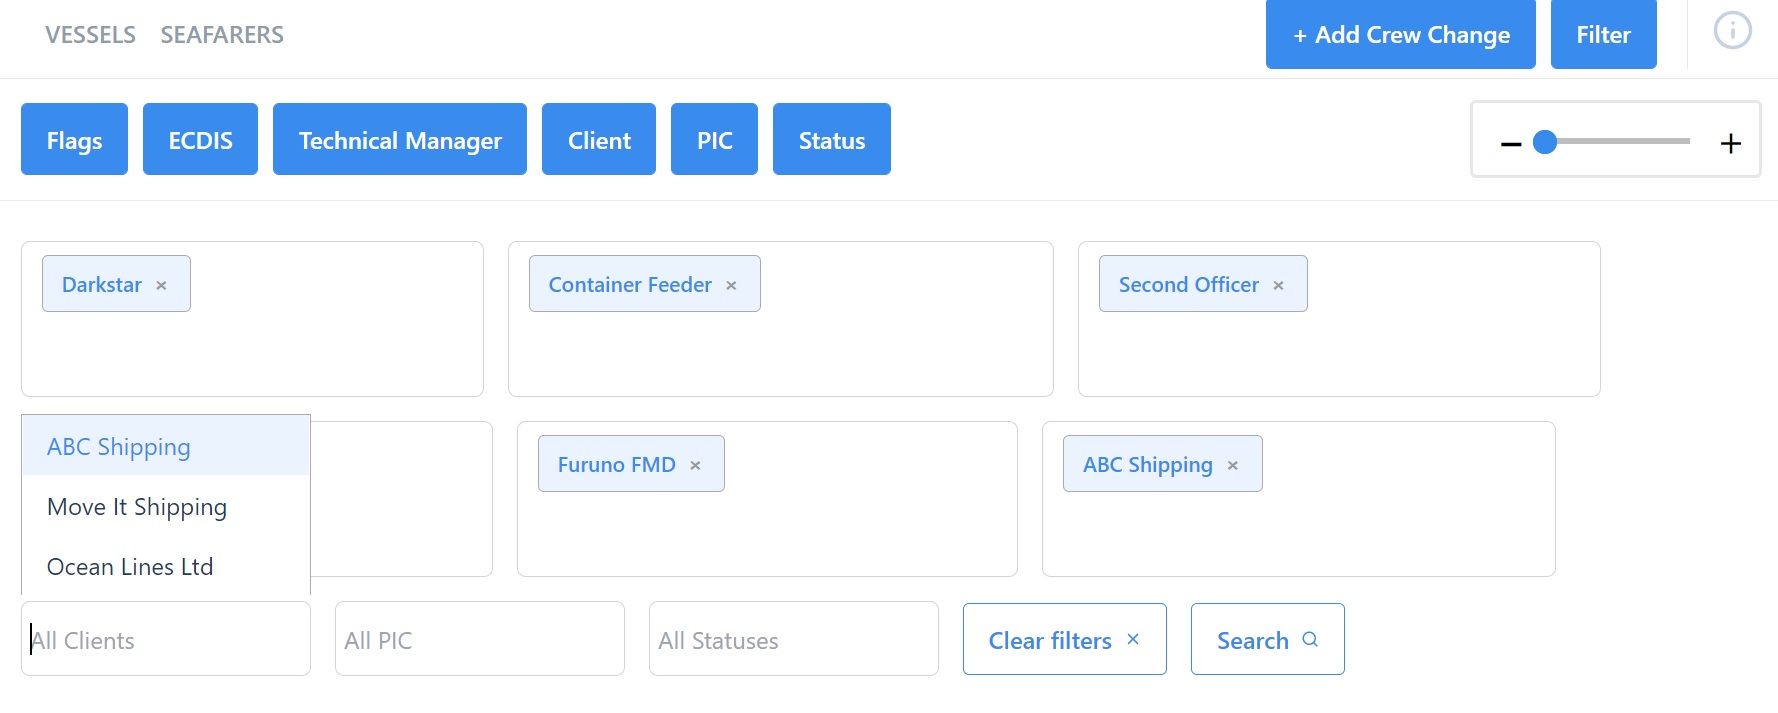
To remove any of the filters click the blue box named for that filter at the top of the page. It will turn white and the filter will be removed from the drop-down menu options. You can get the filters back by clicking on them again.
In our example, we’re going to remove Flags, ECDIS and Technical Manager:

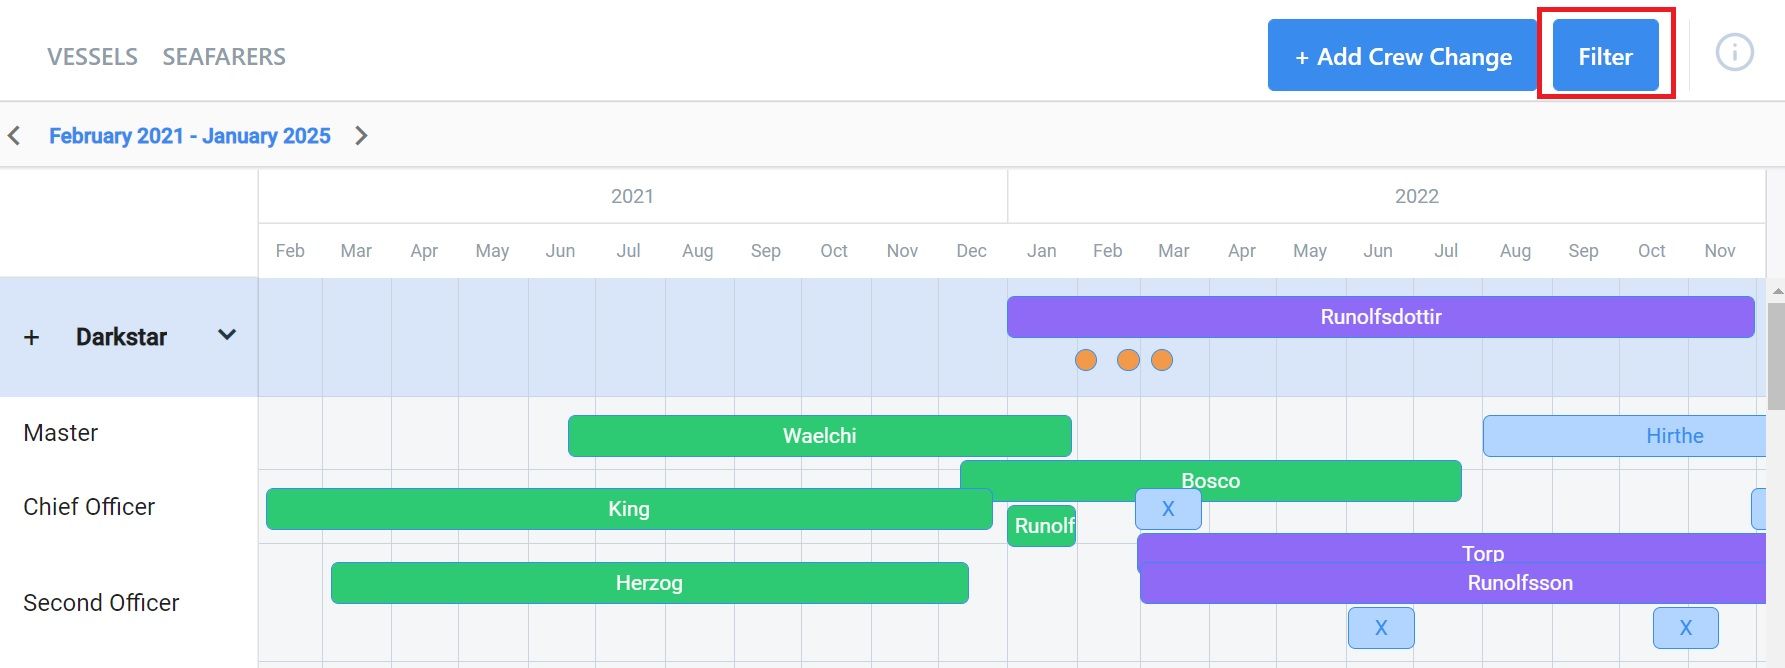
To remove all filters click the Filter button at the top right of the page and the blue filter boxes will disappear. You can get the filters back by clicking on the Filter button again:
How to add a crew change within the crew planning system
Click the blue +Add Crew Change button on the top right of the page:

That will open up a pop-up box that looks like this:
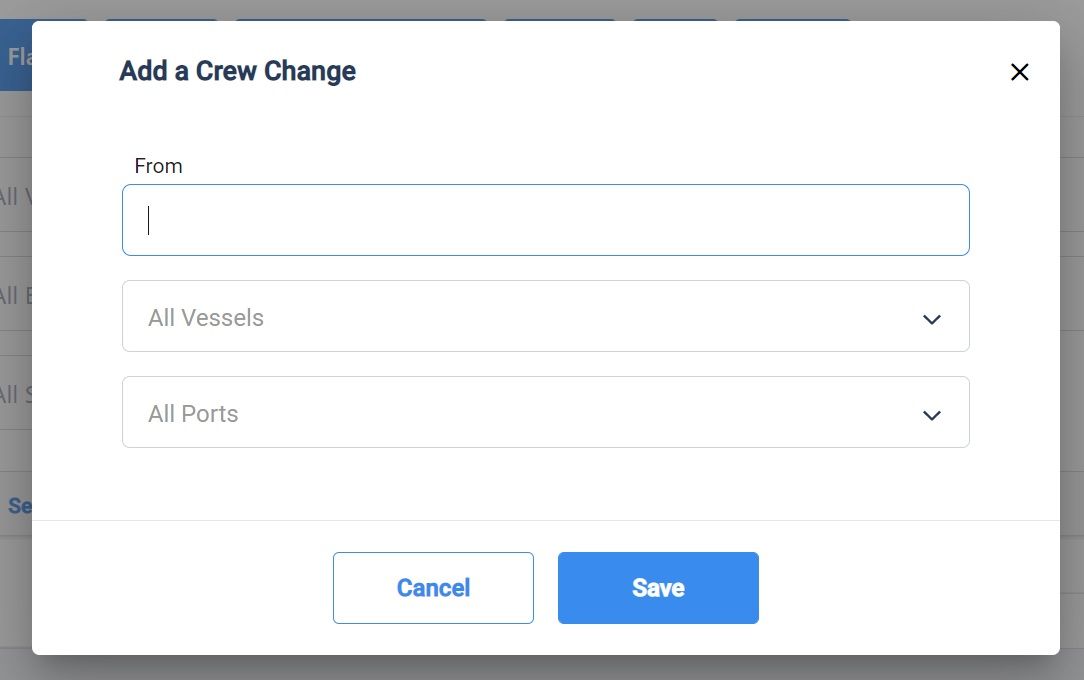
Here you can:
- Add the From Date in the first box.
- Select the vessel from the drop down menu.
- Select the port from the drop down menu.
- Click Save when you're done.
And that's it - you've quickly and easily added a crew change over date to the crewing system.
The only other things left to know about the Vessels page in Planning is how to add an Assignment. That requires a fair amount of explanation, so you might like to take a look at our Planning Support page for that.
PS, why not follow us on Facebook, LinkedIn and Twitter / X!?
And that should be everything you need to know about the Vessels page in our ship crew management system. So now we’re going to take a look at how to use the Seafarers page in Planning.
How the Seafarer page makes crew scheduling easier
This page shows you at a glance who is available ashore so that you can cut to the chase and quickly and easily find and approach the right seafarer for the position.
This page looks very similar to, and works the same way as, the Vessels page. It looks like this:
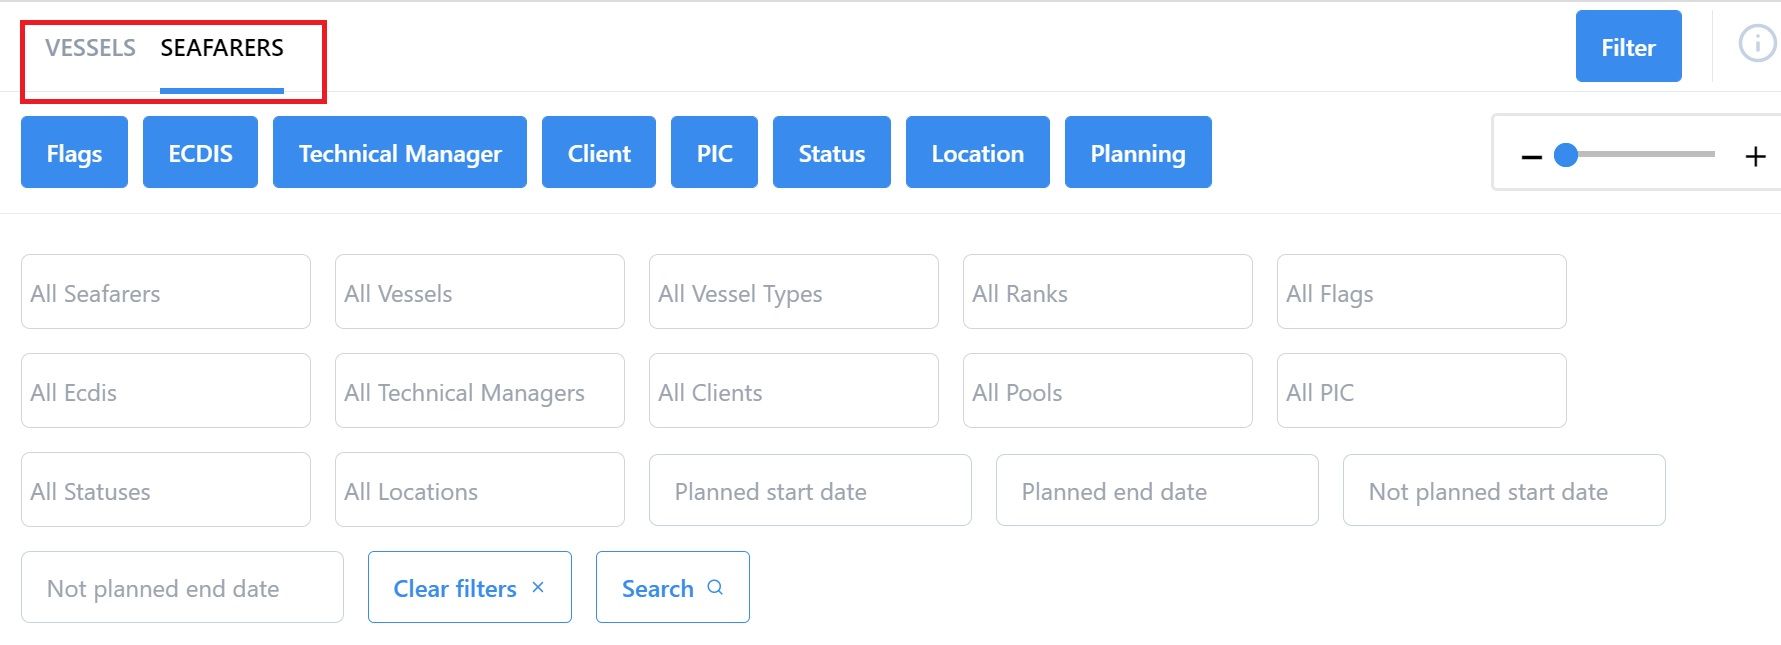
On this page you can:
- Search for your seafarers using the dropdown boxes under All Seafarers, All Vessels, All Vessel Types, All Ranks, All Flags, All ECDIS, All Technical Managers, All Clients, All Pools, All PIC (Person in Charge), All Statuses, All Locations, Planned Start Date, Planned End Date, Not Planned Start Date and Not Planned End Date.
- Filter your search by Flags, ECDIS, Technical Manager, Client, PIC, Status, Location and Planning.
- Remove any of the filters by clicking on the blue box named for that filter at the top of the page.
- Remove all filters by clicking the blue Filter button at the top right of the page.
- View the calendar and see the current status of your chosen seafarer at a glance.
- Make the calendar larger and smaller by clicking on the - and + bar on the top right.
- Click the 'i' icon on the top right to see the color codes for the calendar.
How to use crew Planning on the Seafarers page
To view a seafarer click on any configuration of the boxes called All Seafarers, All Vessels, All Vessel Types, All Ranks, All Flags, All ECDIS, All Technical Managers, All Clients, All Pools, All PIC, All Statuses, All Locations, Planned Start Date, Planned End Date, Not Planned Start Date and Not Planned End Date.
Each box has a dropdown menu. For example, we have clicked on All Seafarers:
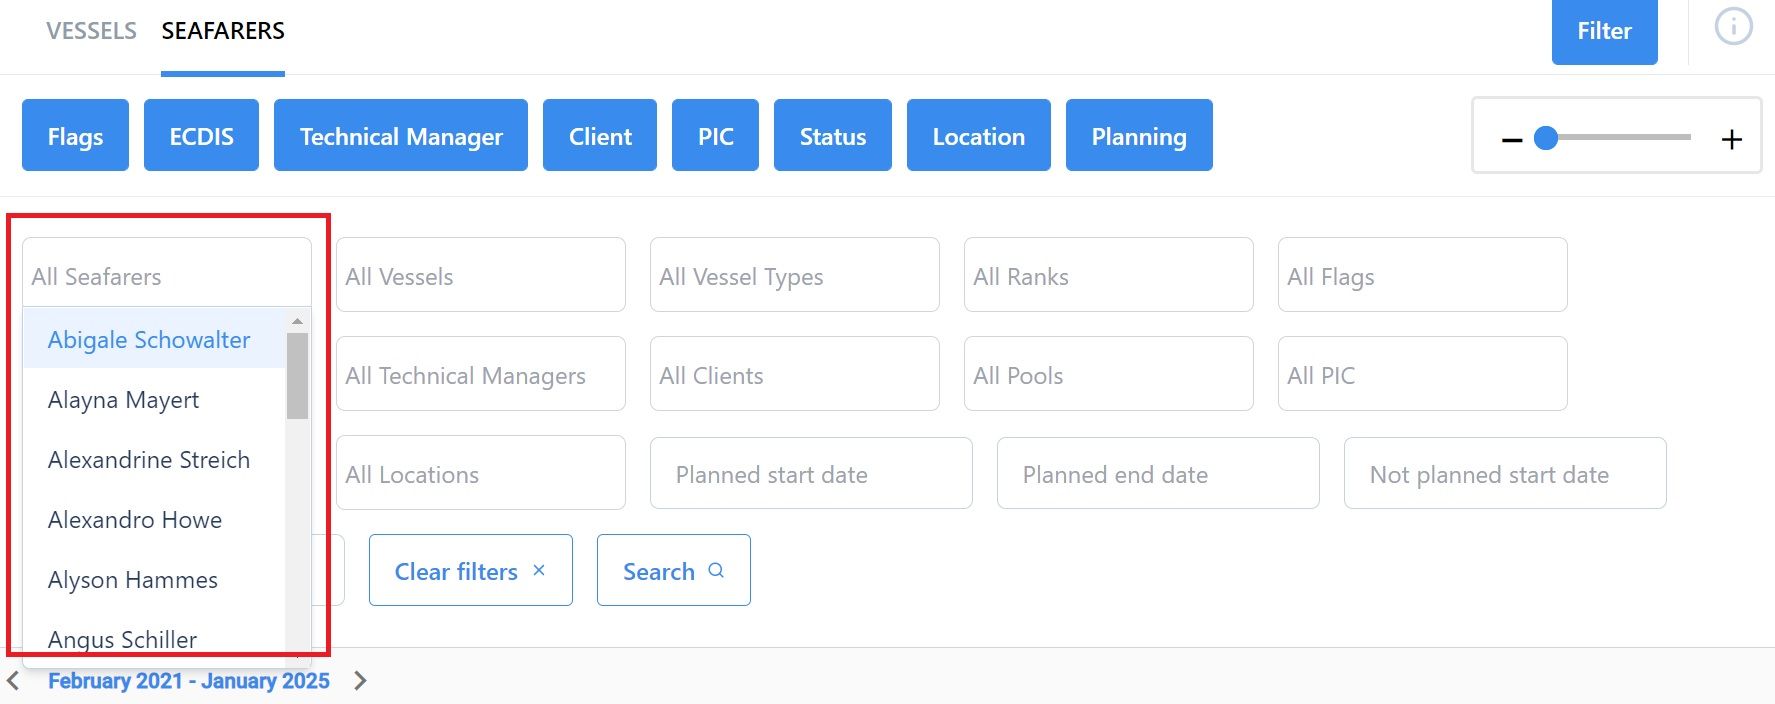
We want to see the planning for our (fictional) seafarer Clifford Bechtelar so we:
- Click on All Seafarers and select Clifford.
- Click the Search button.
- Click the Filter button to remove the filters and enlarge the calendar.
Now we can see Clifford Bechtelar’s schedule in the calendar below:

Here you can:
- See that Clifford Bechtelar is a Master.
- See from his calendar that he will be onboard the vessel Etrigan from the end of July to the middle of January.
- Click the 'i' icon on the right of the screen to see what the color coded status of a seafarer is (see image below). The statuses are: Completed, Onboard, Hired, Assignment, Draft or Don’t Need Replacement, Warning and Approved.
- Zoom in or out using the - and + bar at the top.
- Scroll down to see all seafarers if you searched for more than one.
- Scroll across to see future dates.
Double click on the vessel’s name to see the seafarer’s Embarkation Details. That will open a pop-up box that looks like this:
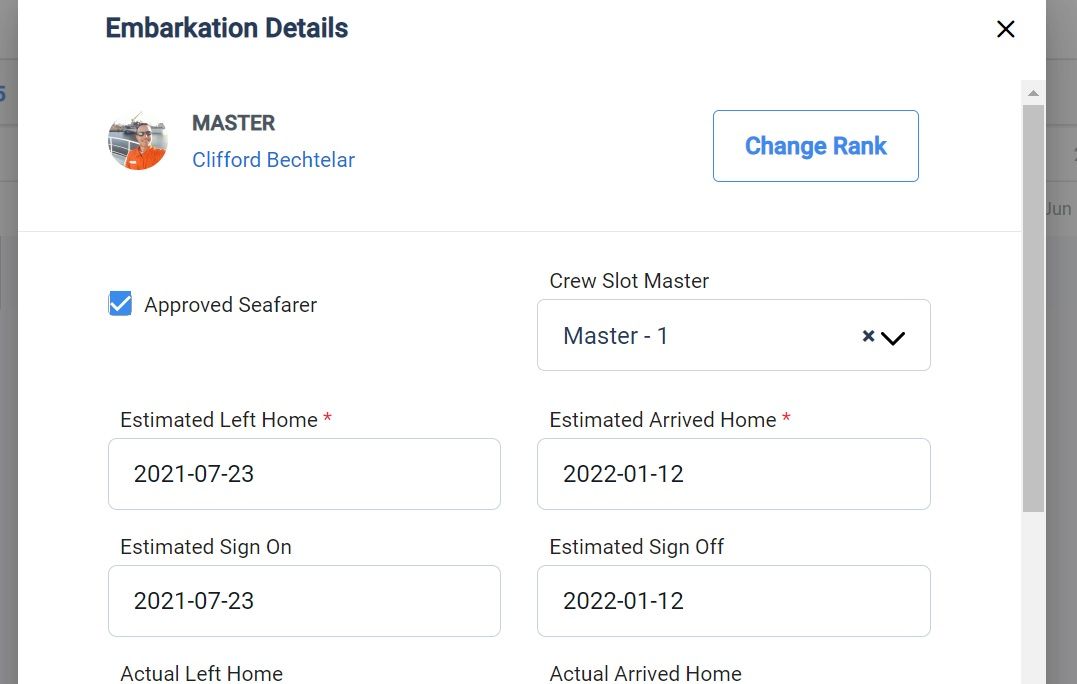
If you want to change any of these details you will need to switch to the Vessels page and find your seafarer there.
How to filter your seafarer search
Filtering your seafarers to make crew planning easier is just the same as filtering your vessels. The only difference is that there are a few extra options for seafarers: All Seafarers, All Pools, All Locations, Planned Start Date, Planned End Date, Not Planned Start Date and Not Planned End Date.
All Seafarers, All Vessels, All Vessel Types, All Ranks, All Flags, All ECDIS, All Technical Managers, All Clients, All Pools, All PIC (Person in Charge), All Statuses, All Locations, Planned Start Date, Planned End Date, Not Planned Start Date and Not Planned End Date.
You can also filter your search results by Flags, ECDIS, Technical Manager, Client, PIC, Status, Location and Planning, or by any combination of these.
And that’s it! We hope this will help you to get the most out of our really useful Planning feature but if you would like an even more in depth guide to using our crewing system and planning software, take a look at our Support website.
Simplifying planning with a crewing system: conclusion
Martide’s maritime recruitment and crew planning platform is a cloud-based Software as a Service that has been designed specifically for use by small to medium sized shipowners and ship managers, as well as for manning agents
From sourcing qualified seafarers to managing every stage of the interview and hiring pipeline to helping you plan crew change overs and ensuring that all of your seafarers’ documents are stored securely in our system, this is the only recruitment and crew planning software you need.
We’d love to help your shipping company become more efficient and streamlined so why not get in touch with us for a no-strings attached chat and see how we can help improve your operations.
This blog post was originally published on May 4th 2021 and updated on May 3rd 2022.

Eve Church
Eve is Martide's content writer, publishing regular posts on everything from our maritime recruitment and crew planning software to life at sea. Eve has been writing professionally for more than two decades, crafting everything from SEO-focused blog posts and website landing pages to magazine articles and corporate whitepapers.
UK

is the only site for maritime jobs

