Planning
A couple of notes about Planning
If you are a manning agent you can see the full crew plan for any vessel you have crew on but you can only see the names and details of seafarers that are with your agency.
Because Planning lets you plan both Vessels and Seafarers you need to have two browser tabs open so you can have both the Vessels and Seafarers pages open at the same time.

Using the Vessels Planning page
Log into your Martide account and click Planning in the menu on the left. You will go to the Vessels Planning page:
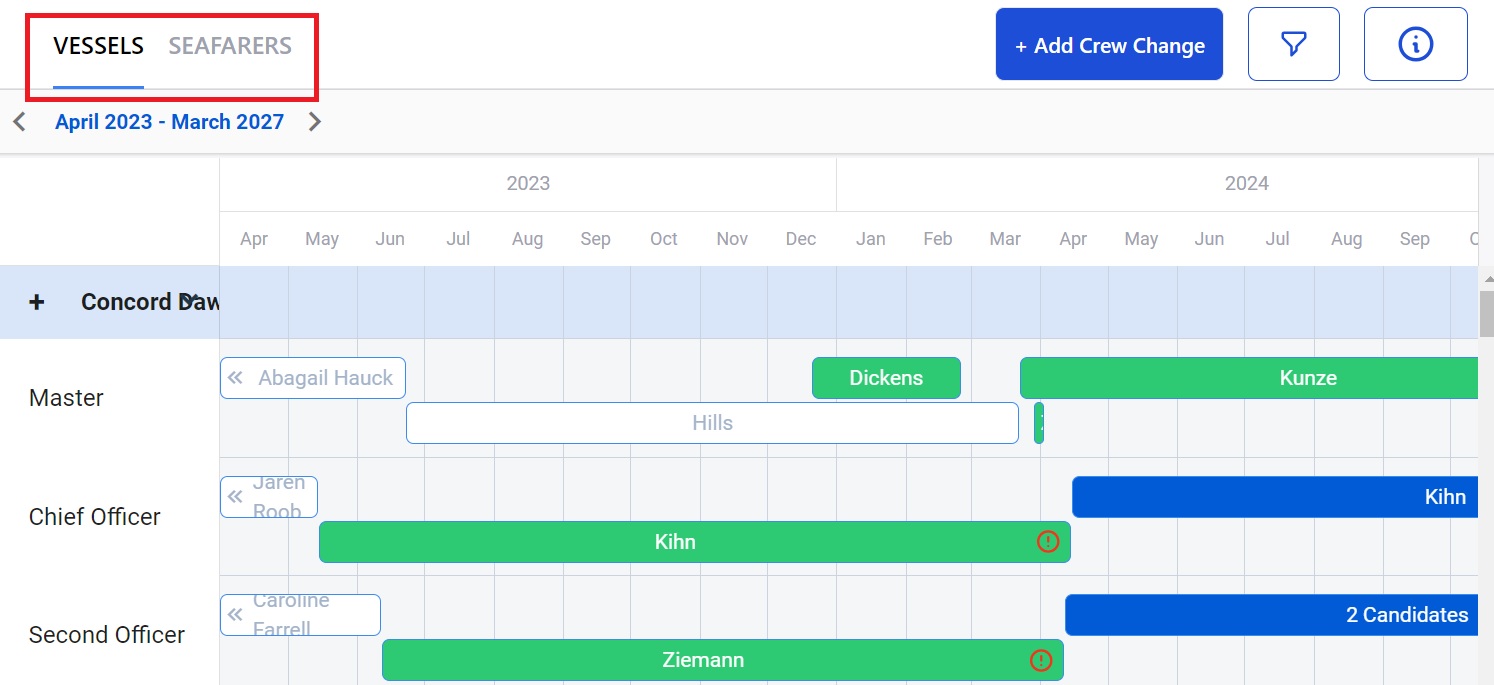
This page shows you who is on your vessels and lets you plan crew. You can also:
- Add a new Crew Change by clicking the Add Crew Change button.
- Click the funnel icon at the top to filter your vessels by Name, Type, Ranks, Flags, ECDIS, Technical Manager, Client, PIC, and Status. (Manning Agents do not have the Tech manager, Client or PIC options.)
- View the calendar and see the current crew status of your vessels.
- Click the 'i' icon on the top right to see the color codes for the calendar.
- Create an Assignment and convert a draft Assignment into an Assignment. (Manning Agents can only create draft Assignments.)
How to use Planning on the Vessels page
Scroll down the page to find the vessel and its crew or use the filters to find a specific vessel, rank or other search parameter. In our example we are looking at the crew plan for our vessel Concord Dawn:
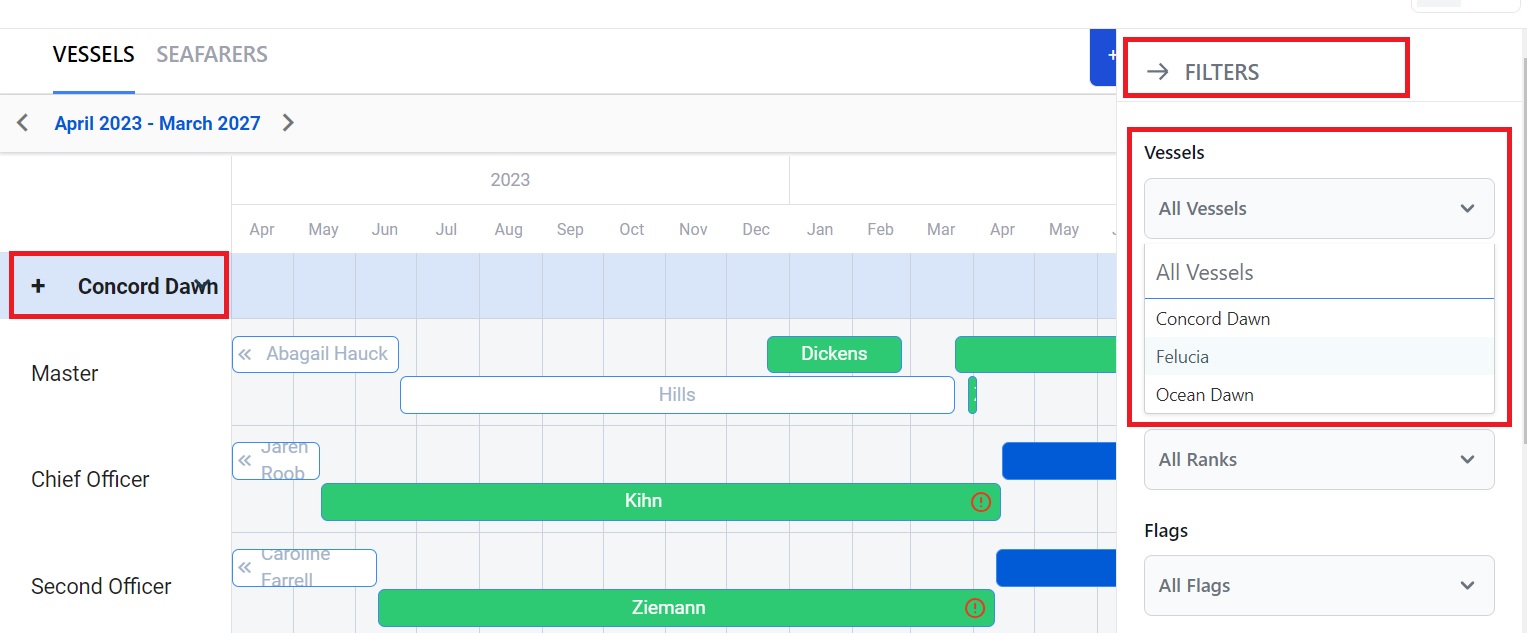
Here you can:
- See who is onboard now and who is lined up to replace them. (If you are a Manning Agent and a seafarer is not from your agency you will see the colored bar but no name.)
- Click the i icon at the top to see what the color coded statuses are. (See below.)
- Scroll down to see all your ranks on that vessel.
- Scroll across to see future dates.
- Add a Crew Slot.
- Create an Assignment and convert a draft embarkation plan into an Assignment. (Crew managers only.)
What the color coded statuses mean
- If a bar is white, that seafarer has completed their contract. If you click on it you will see a pop-up box with the Assignment's details. You can edit some of these details, such as arrived home dates, and you can make notes.
- If a bar is green, that seafarer is currently onboard. If you click on it you will see a pop-up box with the Assignment's details. You can edit some of these details.
- If a bar is dark purple, that seafarer has been hired.
- If a bar is dark blue, there is currently an open Assignment for that crew change. If you click on it you will see who is currently in the Recruitment Pipeline. You can also add more candidates, update the dates, and transfer a seafarer to another Assignment.
- If the bar is light blue, a draft Assignment has been created. If you click on it you can see the draft's details and create an actual Assignment.
- If the bar is light purple, a Manning Agent has created a draft Assignment.
- If there is a red exclamation mark in a bar it means documents are missing. If you click on it a pop-up box will tell you which ones.
- If there is a blue check mark in a bar it means the crew change has been approved.
Click the i icon at the top and you will see a list of the colors and their meanings:

How to create an Assignment in Planning
An Assignment is where you hire a seafarer for a contract on a vessel at a set date. Manning Agents can only create draft Assignments.
Click and drag your mouse across a blank section in the calendar. In our example we're going to create an Assignment for a Pumpman from April to October:

This will open this pop-up box:
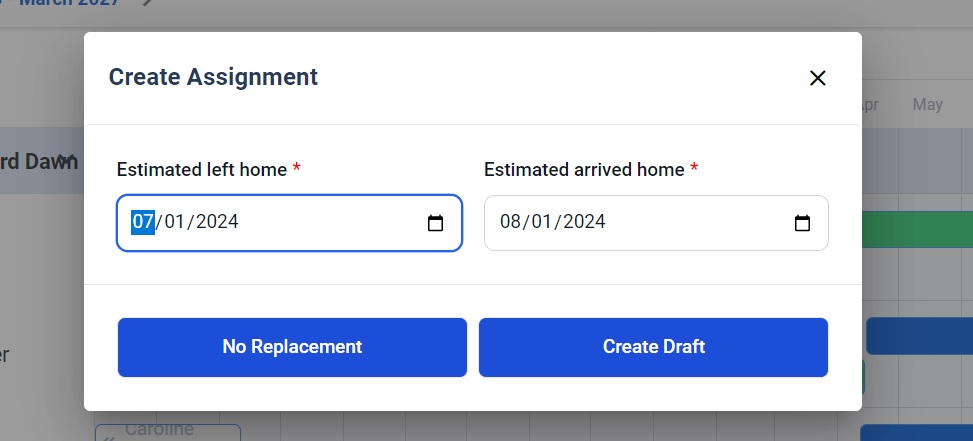
Select the dates you want the Assignment to run from and to. Click No Replacement if a replacement is not needed or Create Draft to create a draft Assignment.
If you click No Replacement you will see this in the calendar:

If you click Create Draft you will see this page. (Note that at first the page will be empty - you need to clear the filters to be able to see the seafarers.)
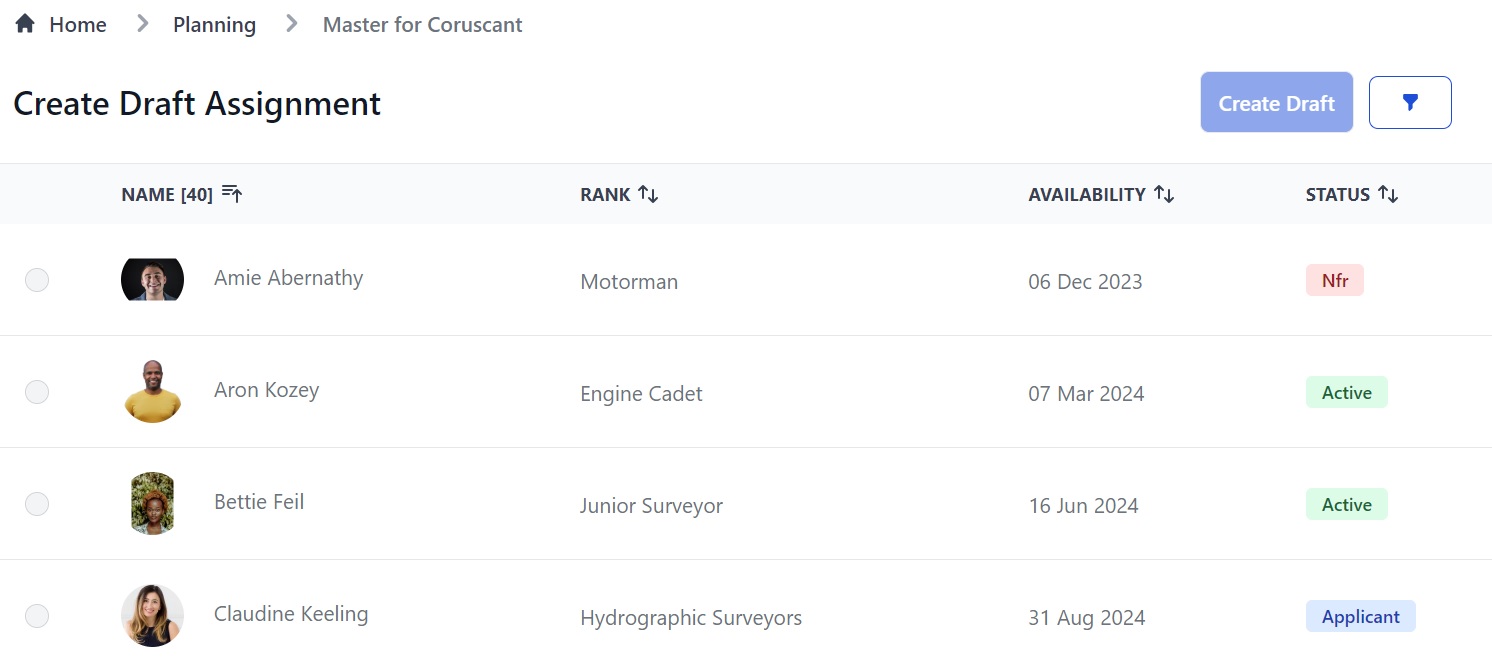
Here you can:
- See the seafarers, their rank, availability date and status.
- Sort the database alphabetically or numerically by clicking the arrows next to Name, Rank, Availability and Status.
- Click the funnel icon to filter seafarers by name, rank, location, seafarer pool and status.
- Check the box next to the seafarer you want to add to the draft Assignment.
- Click the Create Draft button and the seafarer will now show on the planning calendar.
Double click on the bar on the calendar with your seafarer's name in it. You will see a pop-up box. Click on the Documents tab and you will see this:
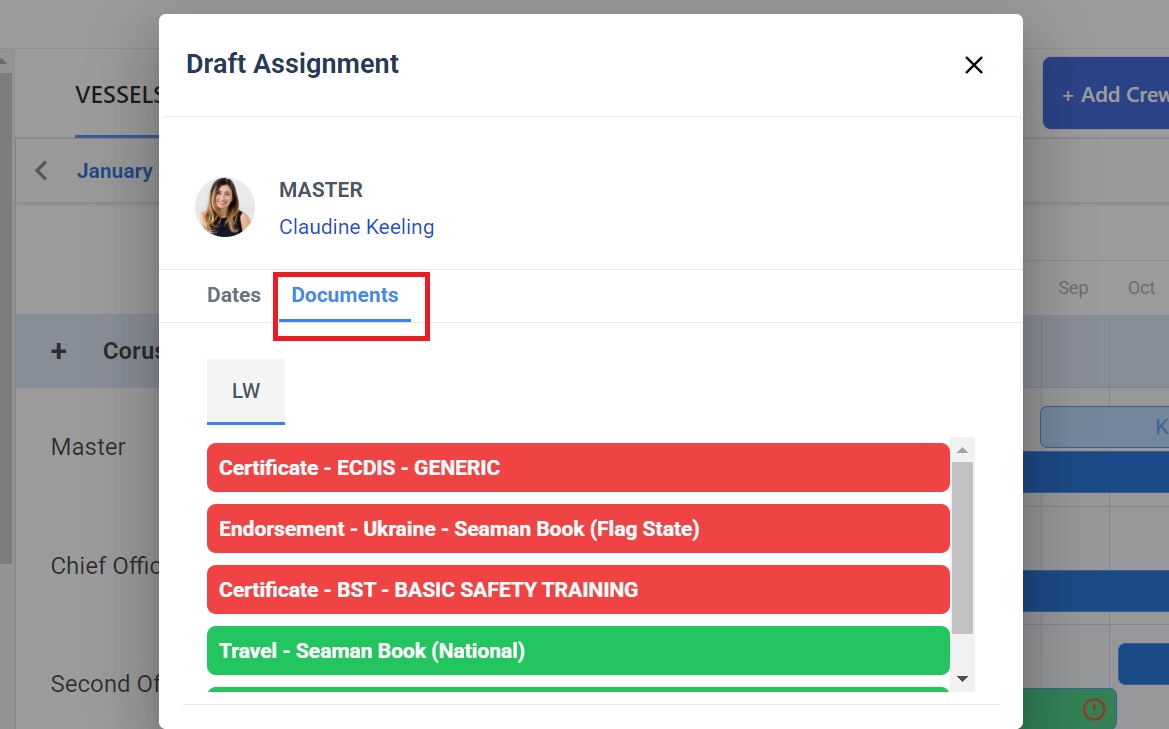
Here you can:
- See if your seafarer is missing any documents (in red.)
- On the Dates tab, check the box if they are an Approved Seafarer.
- On the Dates tab, edit the Estimated Left Home and Estimated Arrived Home dates.
- Save or delete the draft or create an Assignment.
When you click Create Assignment you will see this:
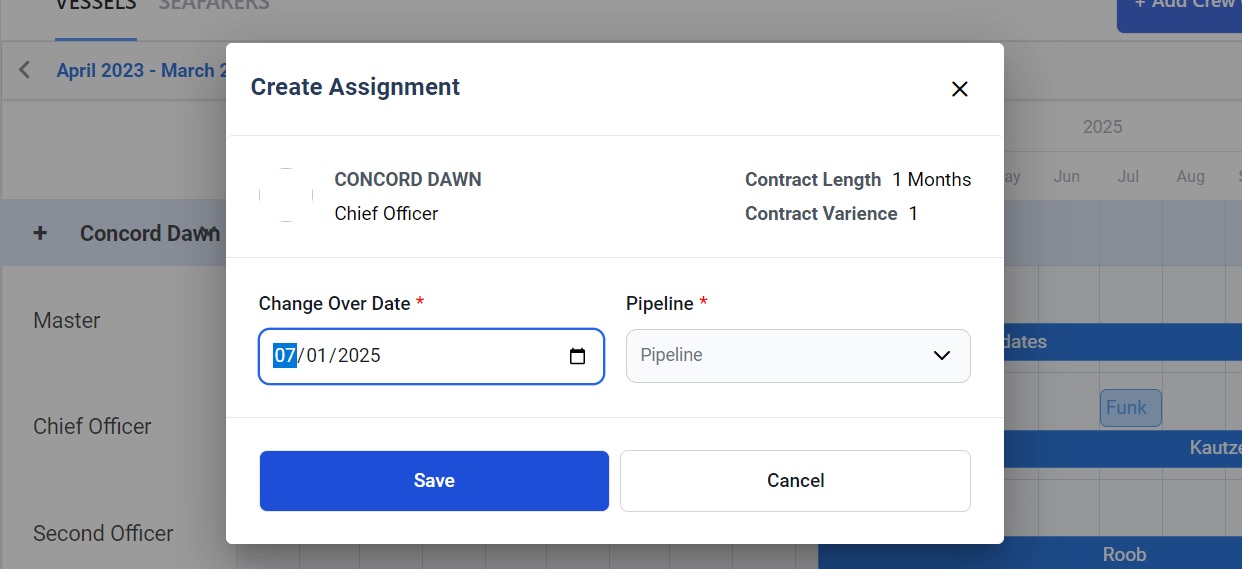
Here you can:
- See the name of the vessel, the rank, the contract length and the contract variance.
- Edit the change over date.
- Select a Pipeline from the drop down menu.
- Click Save and the bar on the calendar will change from light blue (Draft or Don't Need Replacement) to dark blue (Assignment.)
Now if you click on the bar you will see this:
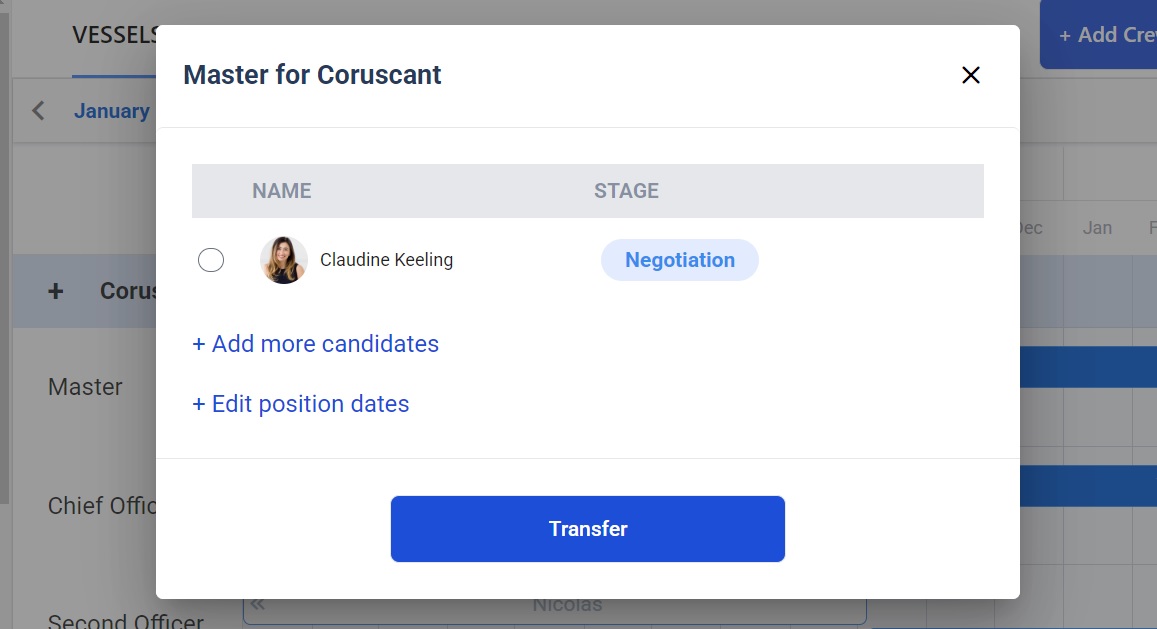
Here you can:
- See the rank and vessel name.
- See the seafarer and what Stage in the Pipeline they're at.
- Click on the seafarer's name to go to their Profile.
- Add more candidates. If you add another candidate, the bar on the calendar will replace the seafarer's name with '2 Candidates' etc.
- Edit the contract dates.
How to change a seafarer’s rank in Planning
If you need to change a seafarer’s rank while they're onboard, click their name in the calendar to see the Assignment details. Click Change Rank:
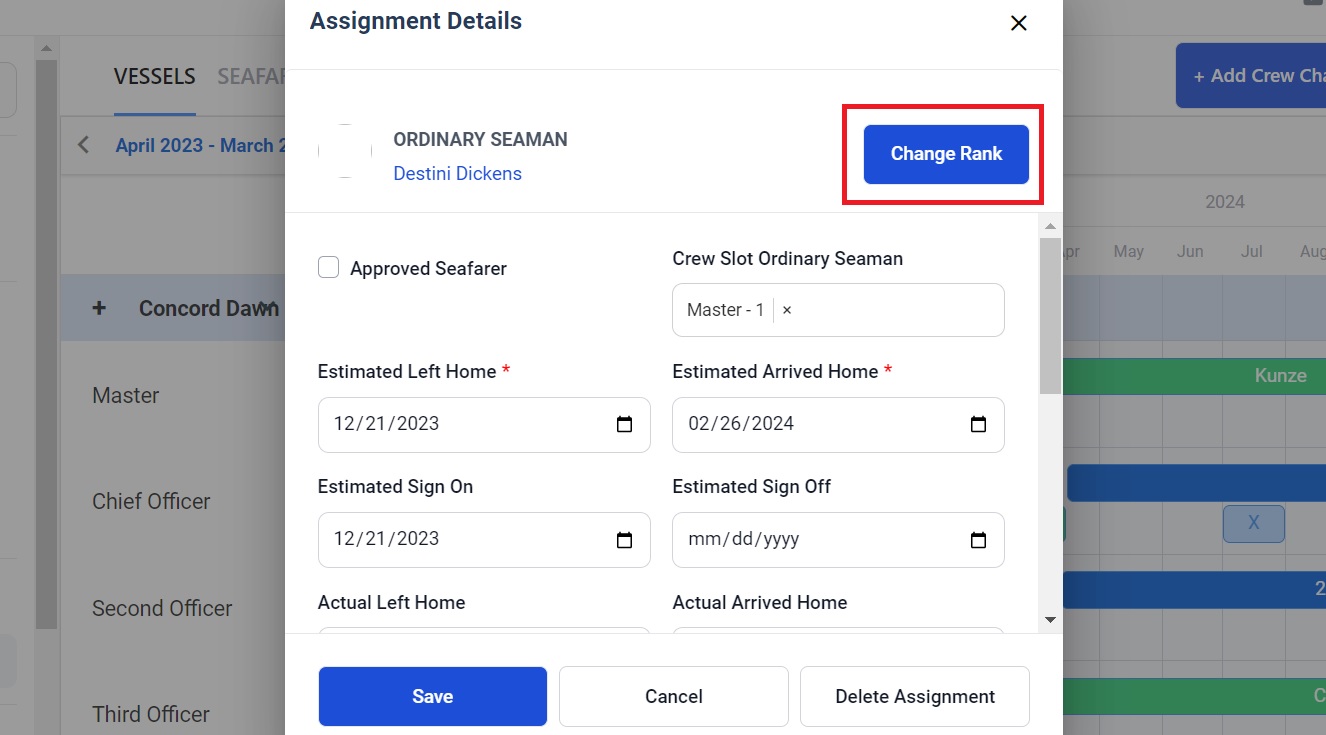
That will open this pop-up box:
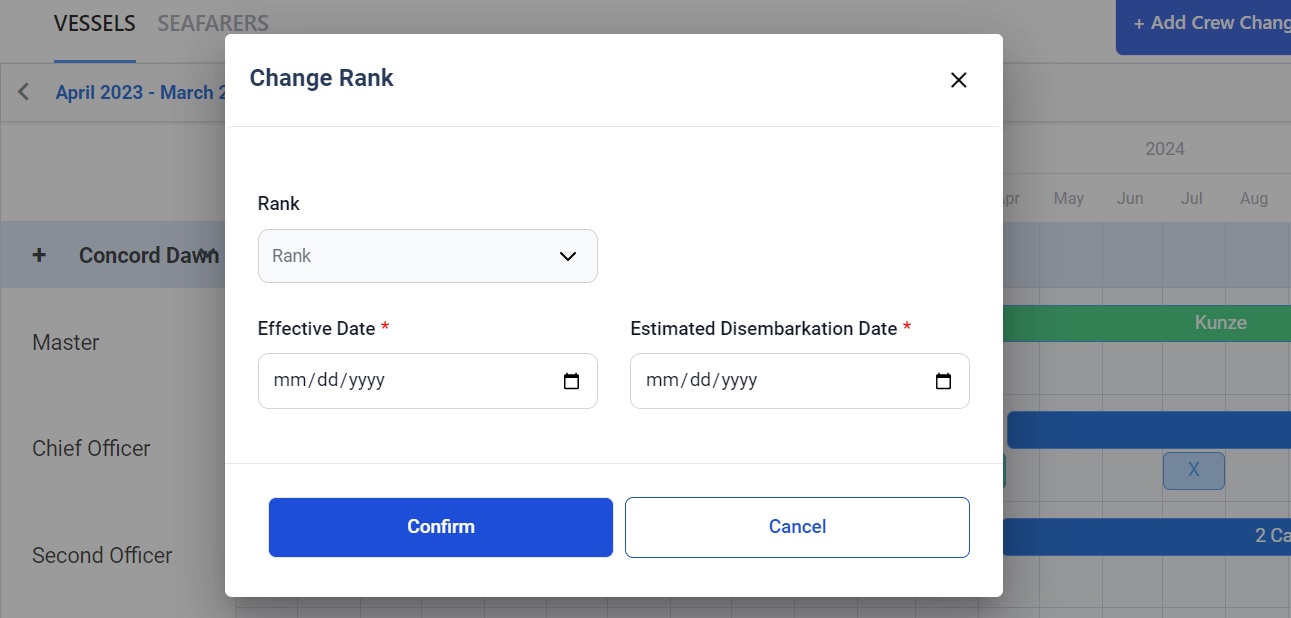
Here you can:
- Select a new rank
- Enter the date the change of rank will be effective from.
- Enter the seafarer’s estimated disembarkation date.
How to add a Crew Change
Click the Add Crew Change button on the top of the page:

That will open this pop-up box:
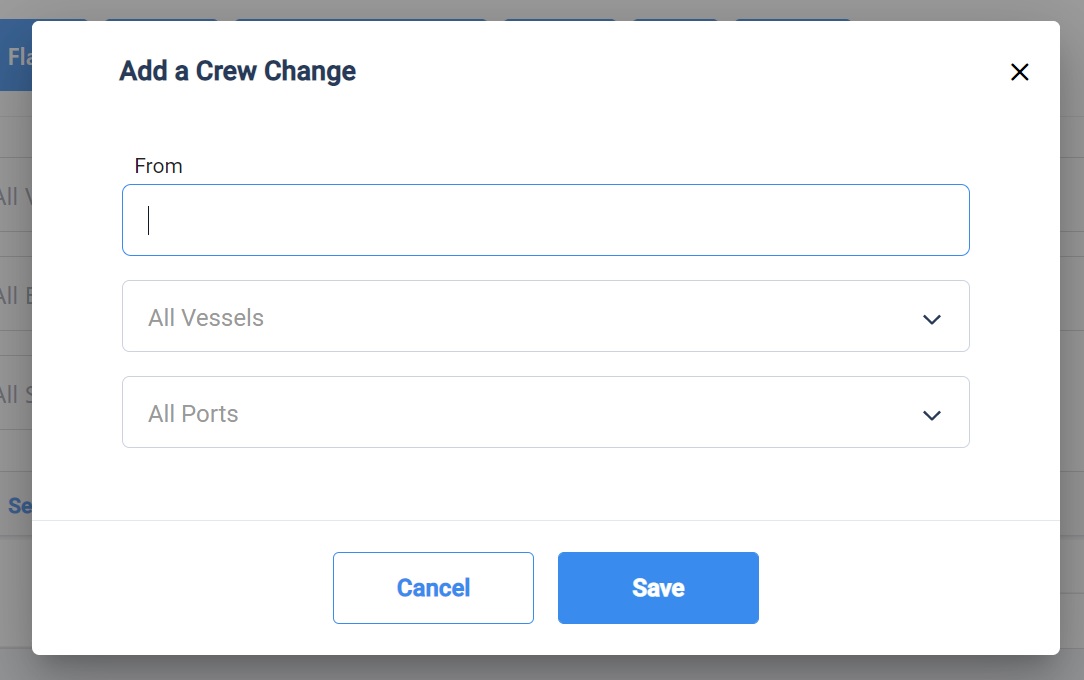
Here you can:
- Add the from date in the first box.
- Select the vessel from the drop down menu.
- Select the port from the drop down menu.
How to add a Crew Slot
Click the plus sign next to a vessel's name in the calendar. It will open a pop-up box where you can select the rank you want to add a slot for:
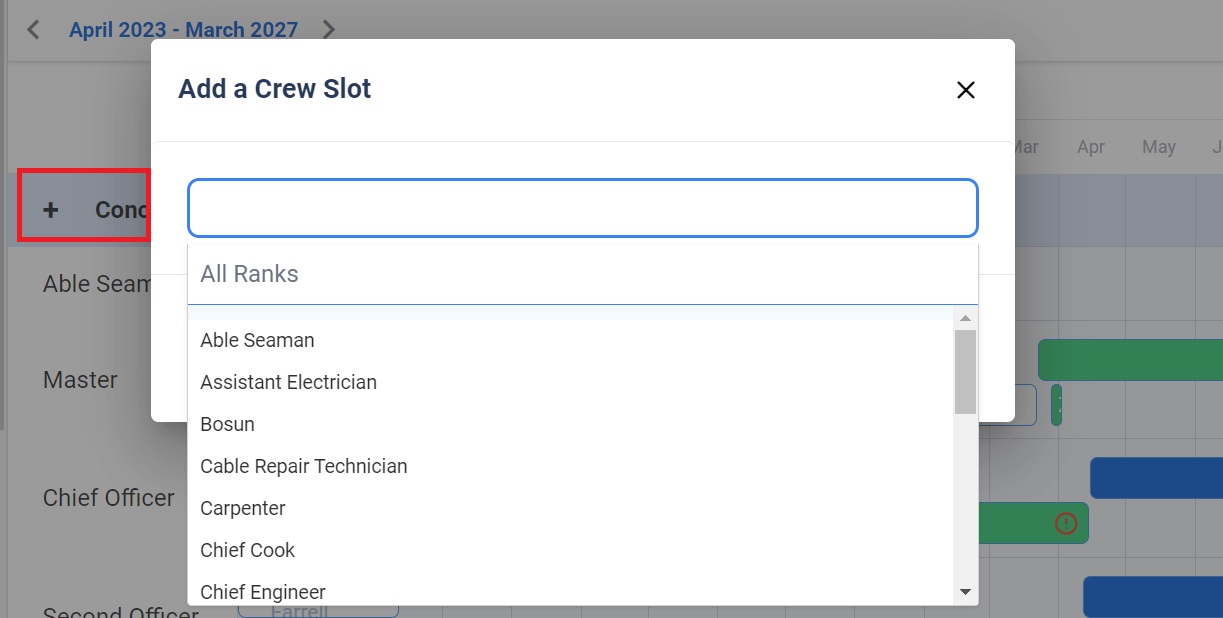
Now we’re going to explain how to use the Seafarers page in Planning.
Using the Seafarers page in Planning
This page works the same way as the Vessels page but with the seafarers in the column on the left and the vessels in the calendar. You can see all crew and which vessels they have worked on, are currently onboard, are in the recruitment Pipeline for, or are embarking in the future.
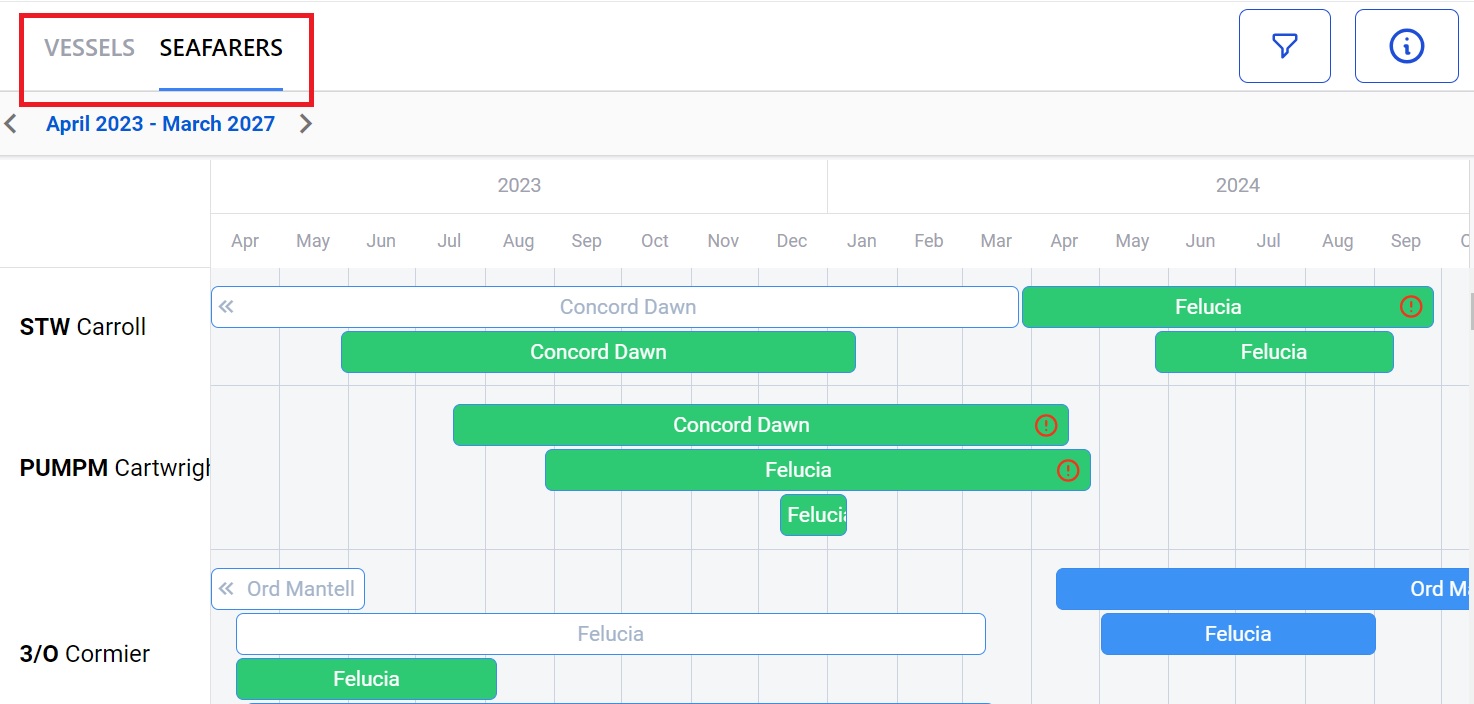
Here you can:
- Scroll down to see your seafarers.
- Click the funnel icon at the top to filter your search by Seafarers, Vessels, Vessel Types, Ranks, Flags, ECDIS, Technical Managers, Clients, Seafarer Pools, PIC, Employment Statuses, Locations, Planned Start and End Dates, Not Planned Start and End Dates. (Manning Agents do not have the Tech Manager, Client or PIC options.)
- View the calendar and see the status of your crew.
- Click the i icon at the top to see the color codes for the calendar.
Scroll down the page to find a seafarer or use the filters to find a seafarer, vessel, rank or other search parameter. In our example we are looking at planning for our seafarer, Steward Andreas Carroll:
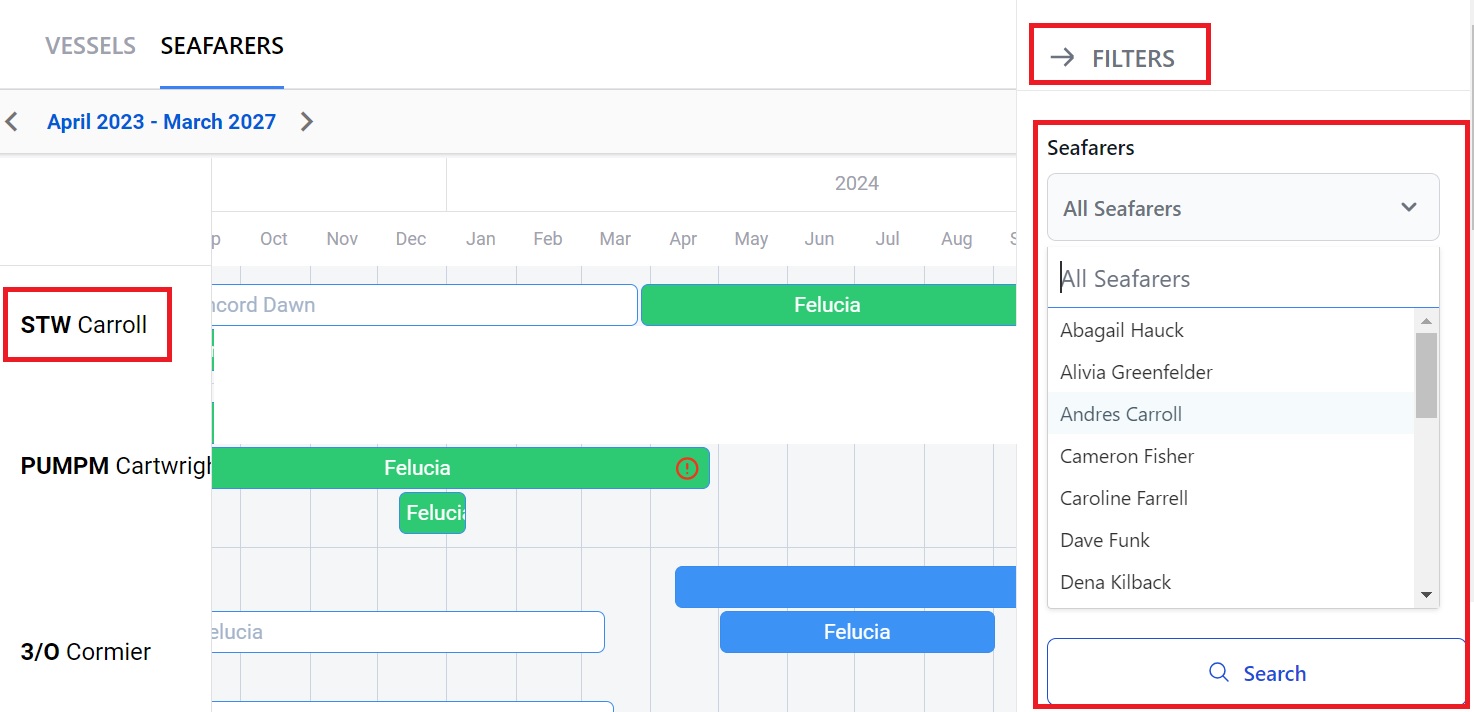
Here we can see that Steward Carroll has completed a contract on the Concord Dawn (white bar) and is currently onboard the Felucia (green bar).
Double click on the vessel’s name to see the seafarer’s Assignment Details, just as you did on the Vessels page and make any changes.
If you need further help please contact us at support@martide.com.