Assignments

The Assignments page is where you can see all your current and closed vacancies (Assignments) and create new ones. 

If you are a manning agent, this is where you can see Assignments a crew manager has shared with you because they want you to find them a seafarer.

Please note there are two similar pages: Assignments and Recruitment. The difference is:

  • Assignments: this is where you hire a specific seafarer for a specific vessel on a specific contract.
  • Recruitment: this is where you add seafarers to the database so that you can potentially hire them in the future.

Click here to see the Recruitment support page.

Understanding the Assignments page

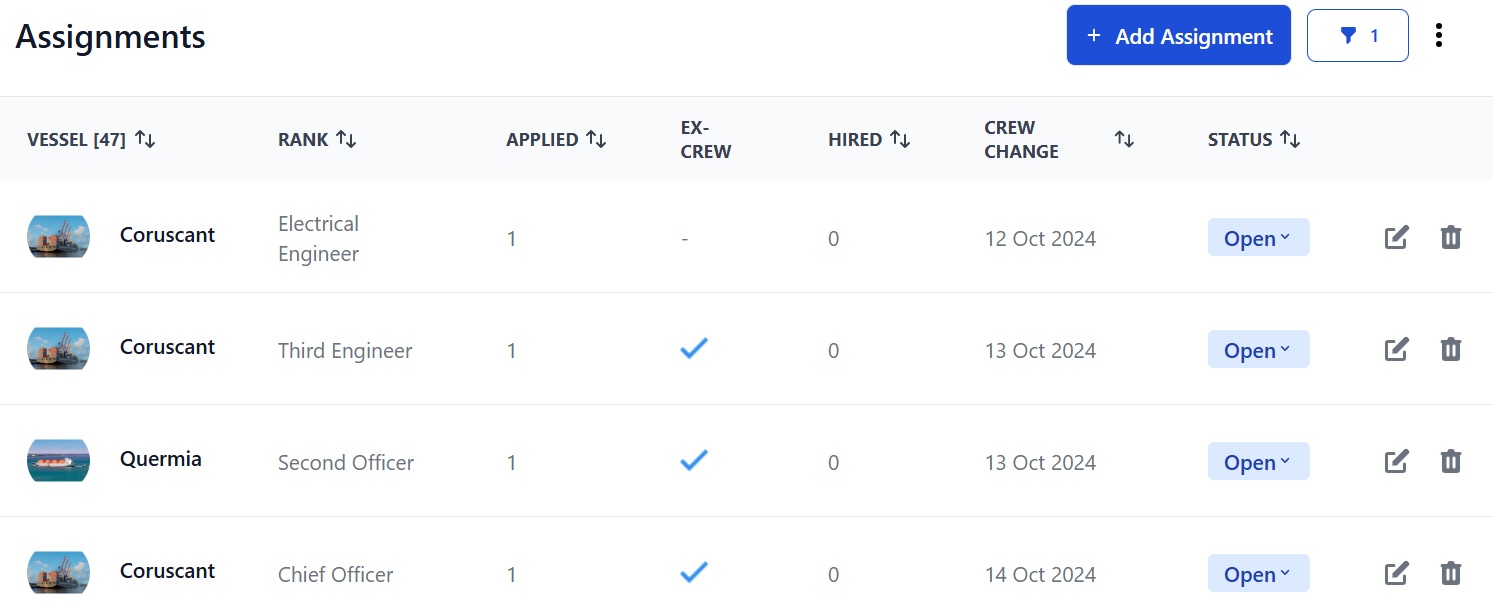
To get started, log into your Martide account and click on Assignments in the menu on the left. You will go to a page that looks like this:

Screenshot of Martide's maritime recruitment and maritime crew management system software

Here you can:

  • Add a new Assignment. (Crew managers only.)
  • See your vessels, the rank, how many candidates have applied, if any candidates are ex-crew, how many have been hired, the change over date, and status.
  • Filter Assignments by Vessel, Rank, Change Over, Status, Applied Candidates, Advertising Agent (crew managers only) and Visibility by clicking the buttons at the top of the page.
  • Click on a vessel's name to see the Assignment details.
  • Change the Status of an Assignment to Open or Closed.
  • Sort your Assignments alphabetically or numerically by clicking the pyramid icon next to Vessel, Rank, Hired, Change Over or Status.
  • Edit an Assignment by clicking the pen icon to the right of an Assignment. (Crew managers only.)
  • Download a list of contracts into an Excel spreadsheet by clicking the download icon at the top of the page.

How to add a new Assignment

If you are a crew manager, click the Add assignment button:

Screenshot of Martide's maritime recruitment and maritime crew management system software

How to add basic information to an Assignment

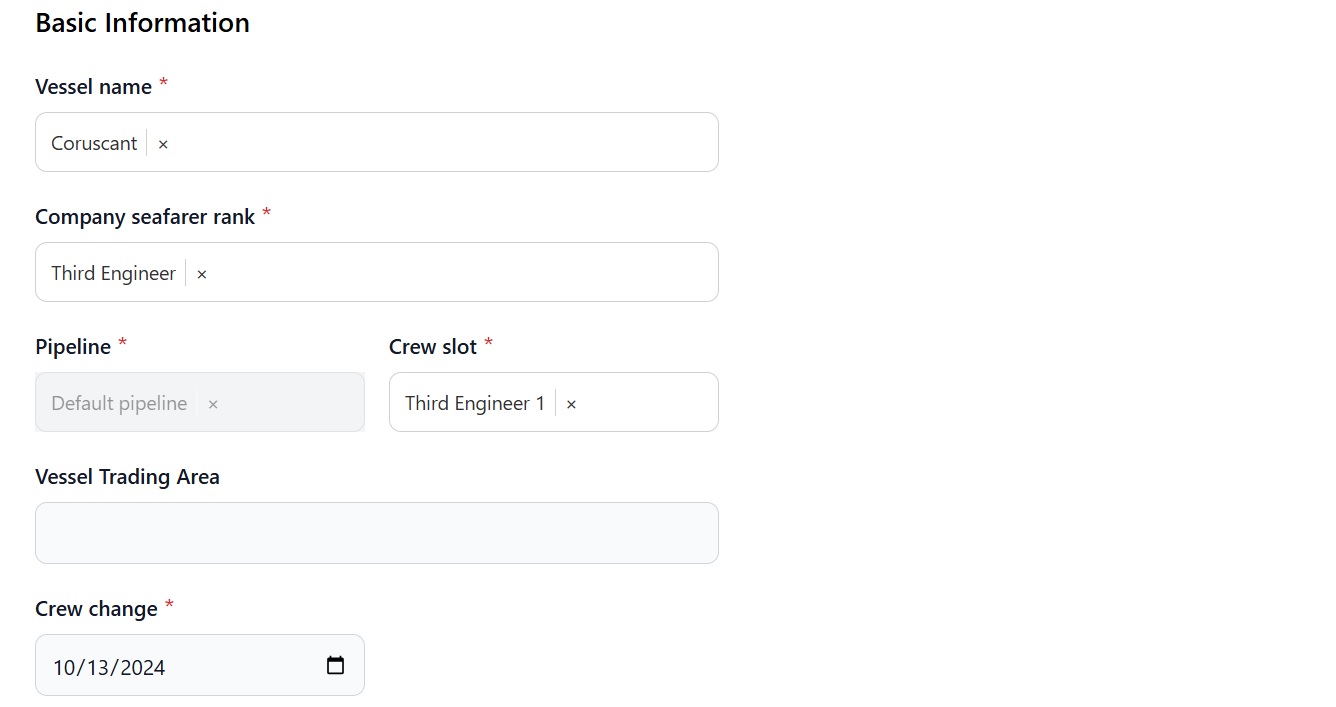
You will go to a page that looks like this. (This page is quite long so we'll look at it in sections):
Screenshot of Martide's maritime recruitment and maritime crew management system software

Here you can:

  • Select the vessel name from the drop down box.
  • Select the rank you are hiring for.
  • Select the Candidate Pipeline and Crew Slot you want to align with the Assignment.
  • Enter the vessel's trading area.

Scroll down and you will see:

Screenshot of Martide's maritime recruitment and maritime crew management system software

Here you can:

  • Enter the crew change date.
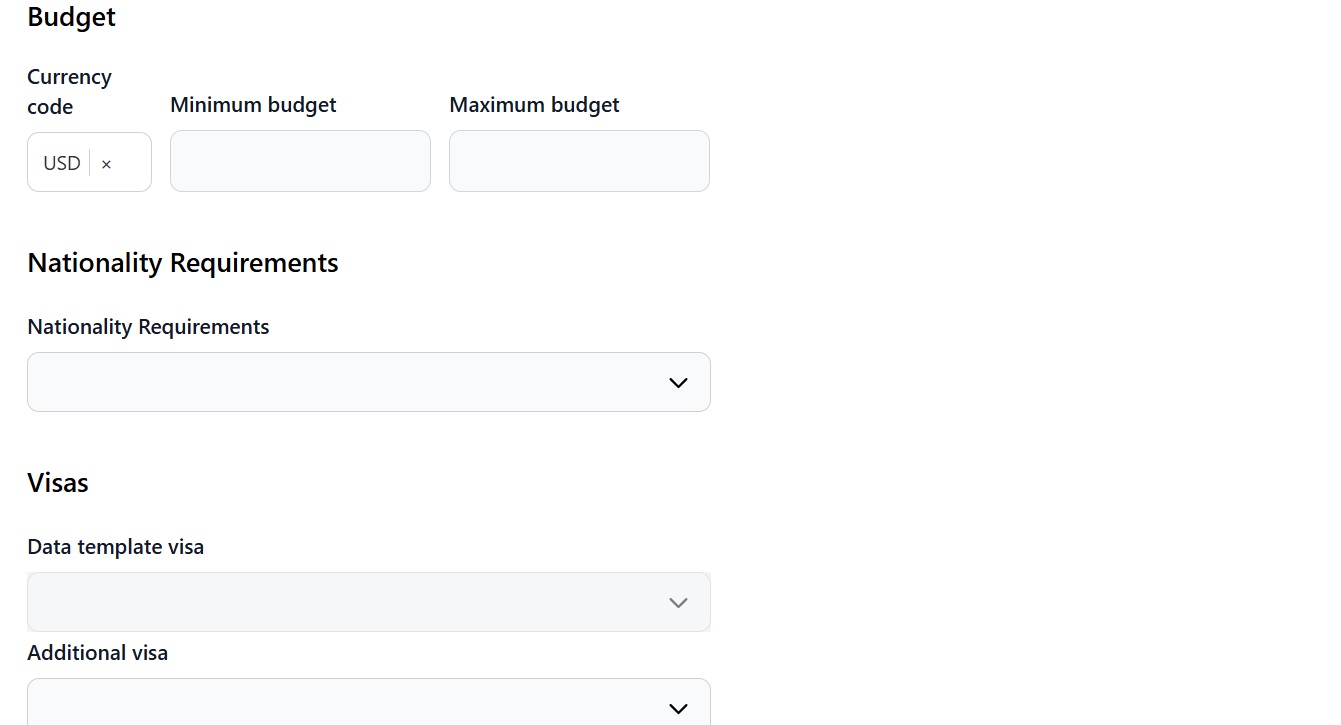
  • Select your currency and enter your minimum and maximum budget.
  • Select the visas you need a candidate to hold. (You can add as many visas as you need.)
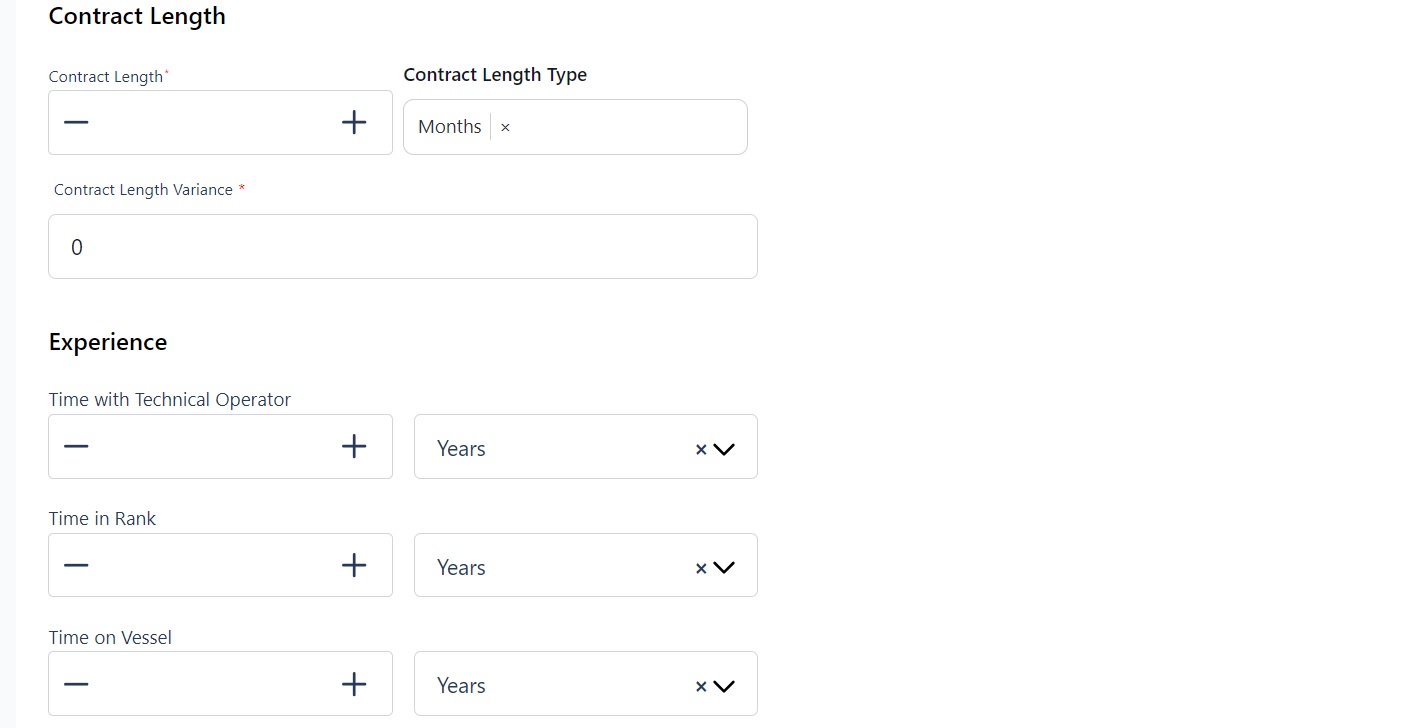
  • Enter the contract length and select whether it's months or days.

Scroll down and you will see:

Screenshot of Martide's maritime recruitment and maritime crew management system software

Here you can:

  • Enter the contract length variance.
  • Enter the experience you want a candidate to have such as their time with a technical operator, in a rank, and on a vessel. Select whether that's in years or months.
  • Write a job description for the Assignment.

When you’ve finished click Next. This takes you to the Requirements section.

Requirements for an Assignment

The Requirements section looks like this:
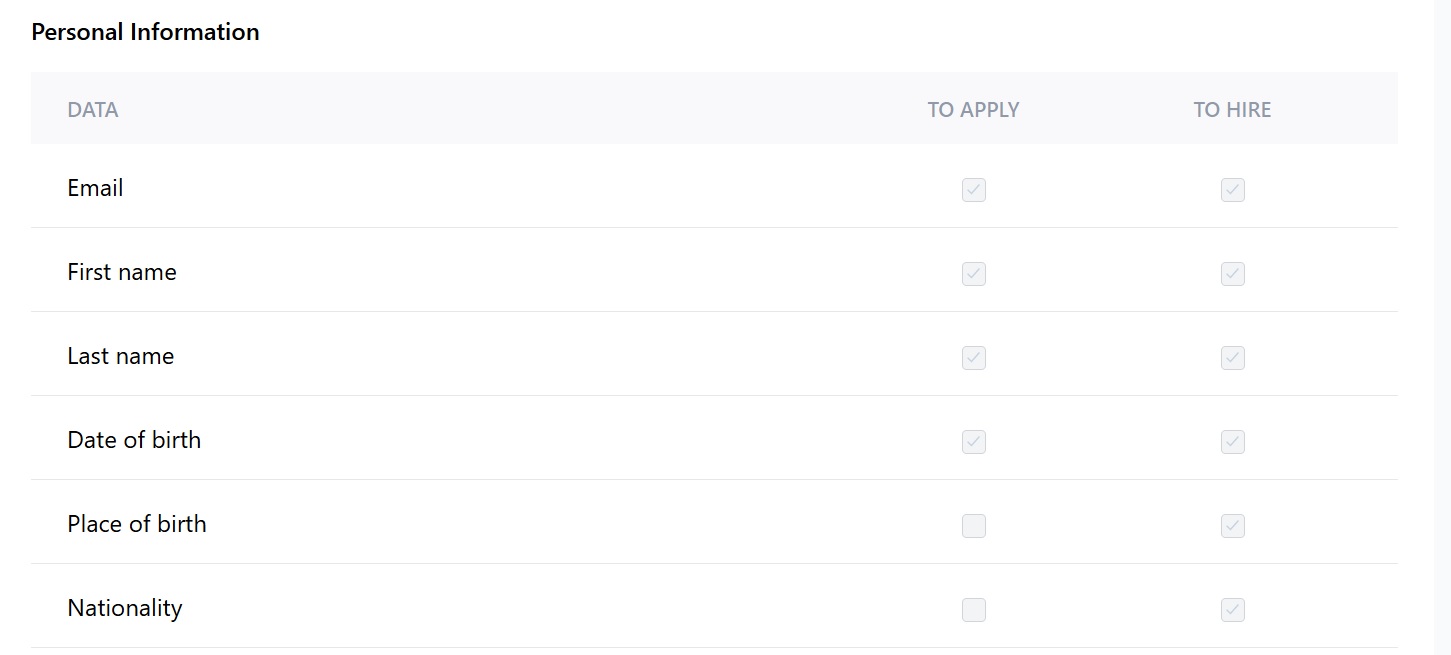
Screenshot of Martide's maritime recruitment and maritime crew management system software

Here you can:

  • See the information a candidate must provide to apply and be hired for the job.

Scroll down and you will see the documents a candidate must hold to apply and be hired for the job: 

Screenshot of Martide's maritime recruitment and maritime crew management system software

Click Next and you will go to the Advertising section.

How to advertise your Assignment

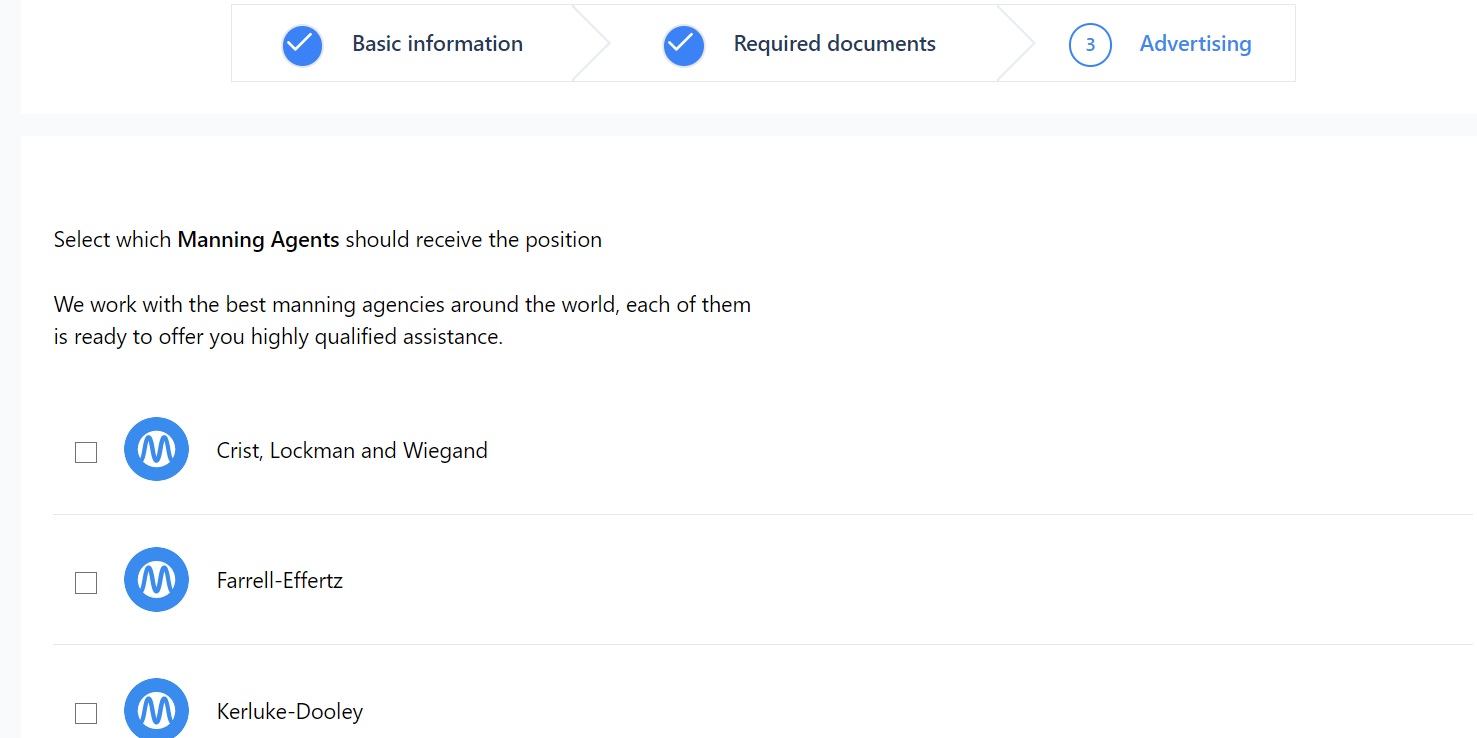
You will go to the Advertising section. The first half of the page looks like this:

Screenshot of Martide's maritime recruitment and maritime crew management system software

Here you can:

  • Select which manning agent(s) you want to use.

Note: If you don’t see one of your manning agents in this section, go to Settings > Manning Agent. There you can choose the manning agents you want to see as an option.

Below this you will see:
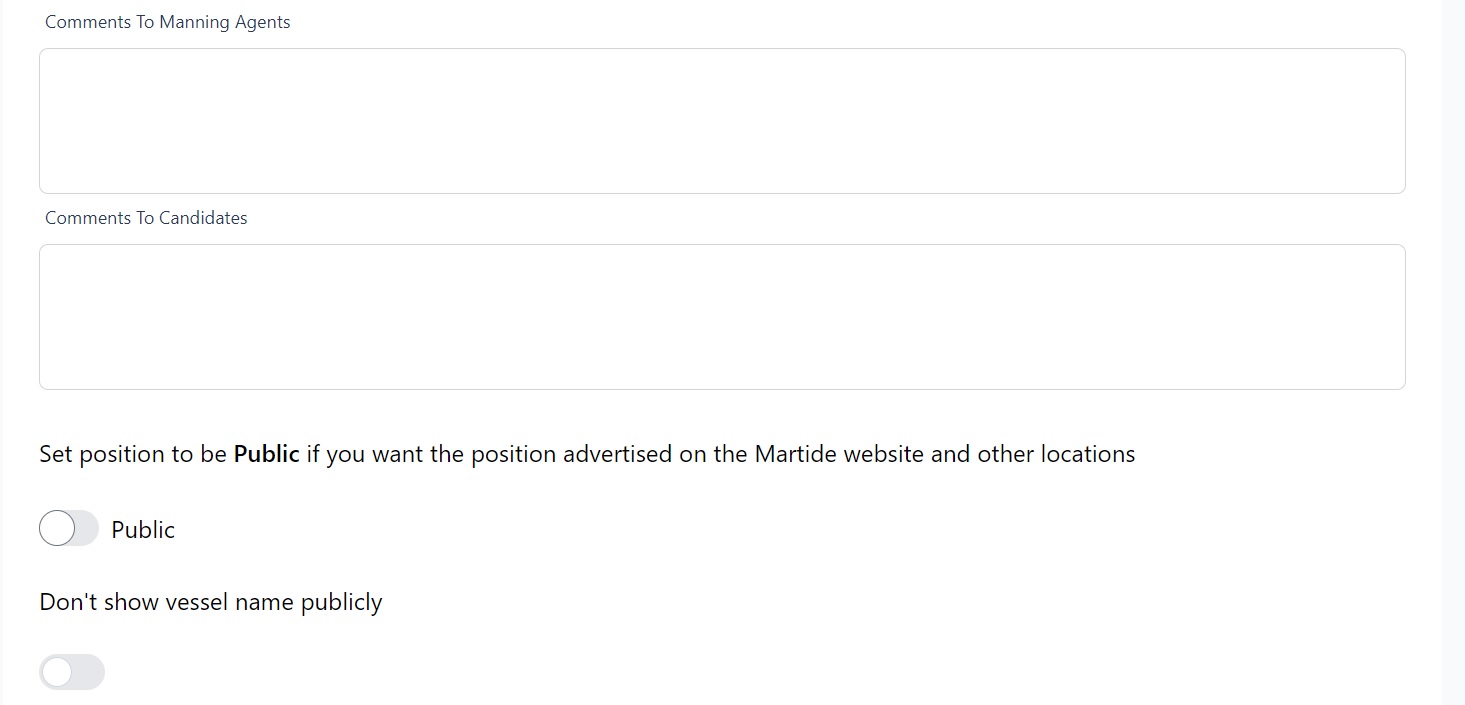
Screenshot of Martide's maritime recruitment and maritime crew management system software

Here you can:

  • Write a comment to the manning agent(s).
  • Write a comment to the candidates.
  • Choose whether you want the position to be public or private. (See below.)
  • Choose whether you want the vessel's name to be public or private.

What are public and private advertisements? 

  1. Public: After posting a public position, your basic requirements will be displayed on Martide’s job page. We’ll look for candidates for your position by checking our database. Candidates can also apply directly.
  2. Private: This lets you send your vacancies to manning agents. Unlike public vacancies, agents will be able to see all the information you included in your Data Template.

In our example above the Private option is turned on (showing grey) and the Public option is turned off (this will show blue). To change the settings, slide the button across.

Please note that unless you have used Alternative Documents to override your Data Template, only candidates holding all relevant documents will be able to apply.

Click the Publish Your Job button when you've finished. You will go to this page:

Screenshot of Martide's maritime recruitment and maritime crew management system software

Here you can:

  • See the name of your vessel, its flag, the rank and crew change date at the top.
  • See the names of any candidates
  • See the pipeline stages for this Assignment.
  • Add a candidate by clicking the Add Candidate button.

How to add a candidate to an Assignment - crew managers

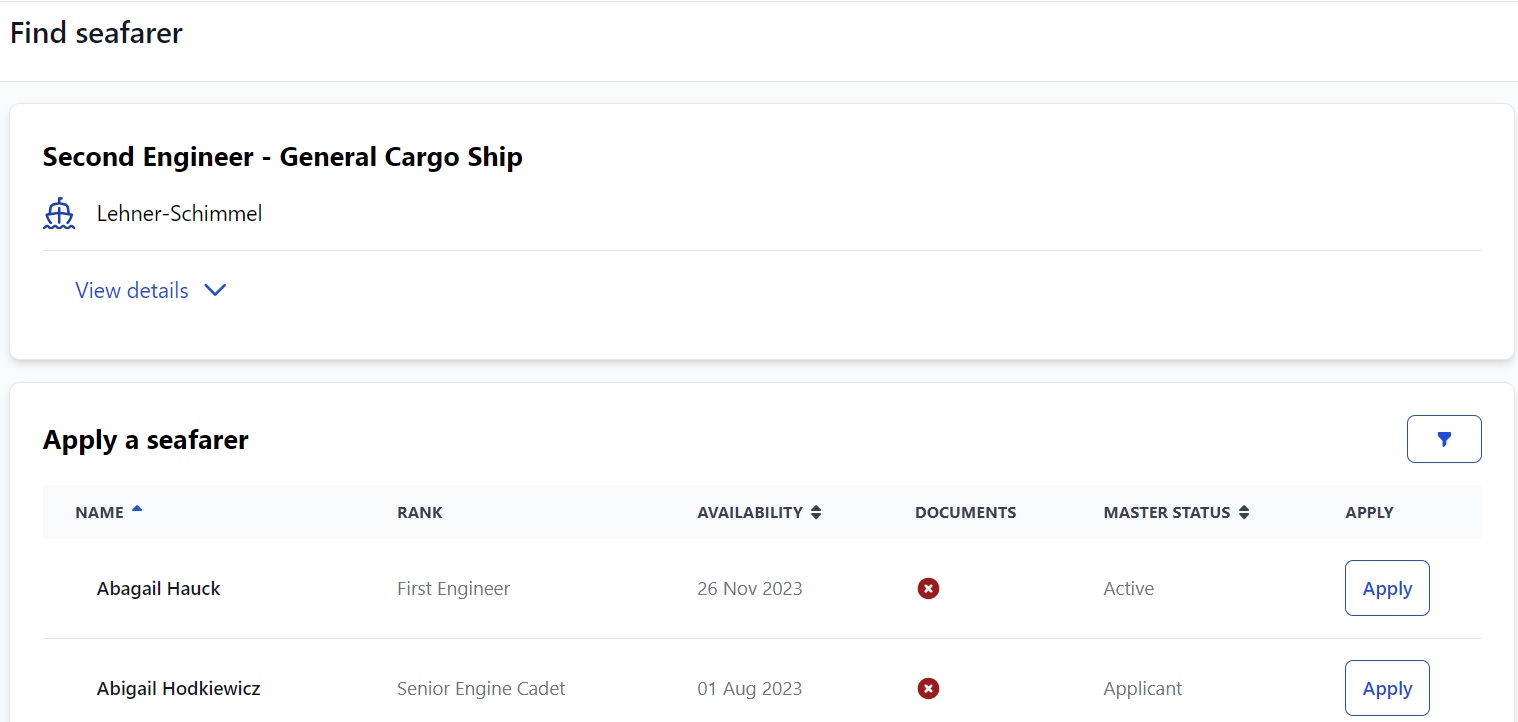
Both crew managers and manning agents can add candidates to Assignments. To do so, click Add Candidate. You will go to this page:

Screenshot of Martide's maritime recruitment and maritime crew management system software

Here you can: 

  • See the rank, vessel type and company name at the top.
  • Click View details to see more info about the Assignment and vessel.
  • See available candidates and their rank, availability, the documents status and the client status.
  • Filter candidates by various searches including name, location, rank, employment history etc. by clicking the filter icon.
  • Apply a seafarer to the job.

Note: if you apply a seafarer who already has a pending assignment you will see a message that says “Are you sure you want to add a seafarer to this assignment?” You will have the option of confirming or canceling.  

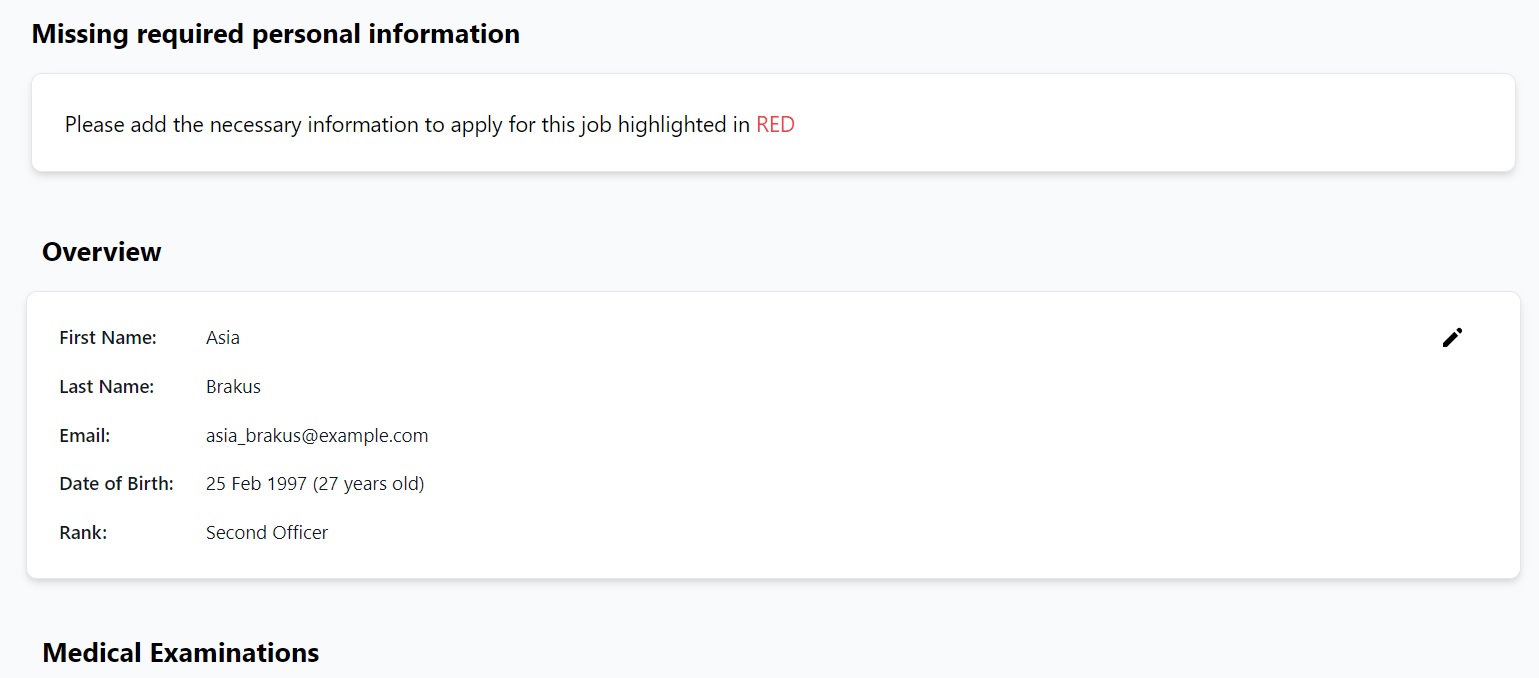
When you click the Apply button for a candidate you will go to this page: 

Screenshot of Martide's maritime recruitment and maritime crew management system software

Here you can:

  • See if any data or documents are missing - in our case we need to add missing info, as per the warning message at the top.
  • See the candidate's name and personal details.
  • Edit those details by clicking the pen icon in the corner.
  • Scroll down to see and edit the candidate's Medical Examinations, Vaccinations, Certificates, Endorsements and Travel Documents.
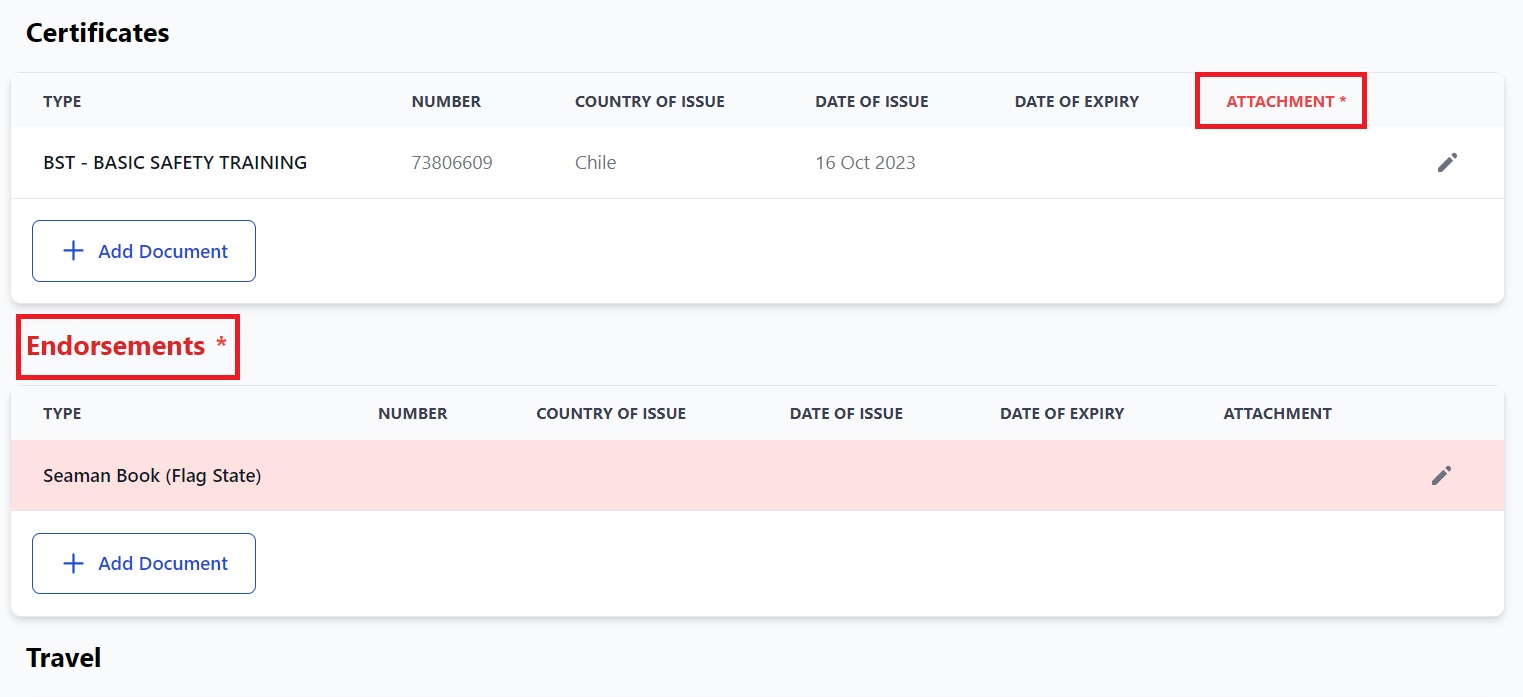
In our example, the candidate is missing a certificate and their endorsements. We must add those before we can apply them: 

Screenshot of Martide's maritime recruitment and maritime crew management system software

When we upload the documents the page looks like this:

Screenshot of Martide's maritime recruitment and maritime crew management system software

Now we can click the Apply button at the bottom of the page and the candidate will be automatically applied to the Assignment/job. You will return to the Find Seafarer / application page where you can apply more candidates if you want to.

How to add a candidate to an Assignment - manning agents

On the main Assignments page, click on a vessel to go to the Assignment. You will go to this page:

Screenshot of Martide's maritime recruitment and maritime crew management system software

Here you can:

  • See the Assignment’s pipeline.
  • See if there are any candidates who have already been applied and are in the recruitment process.
  • Apply a new candidate.

To apply a new candidate, click the Add Candidate button at the top. [FROM HERE ON]

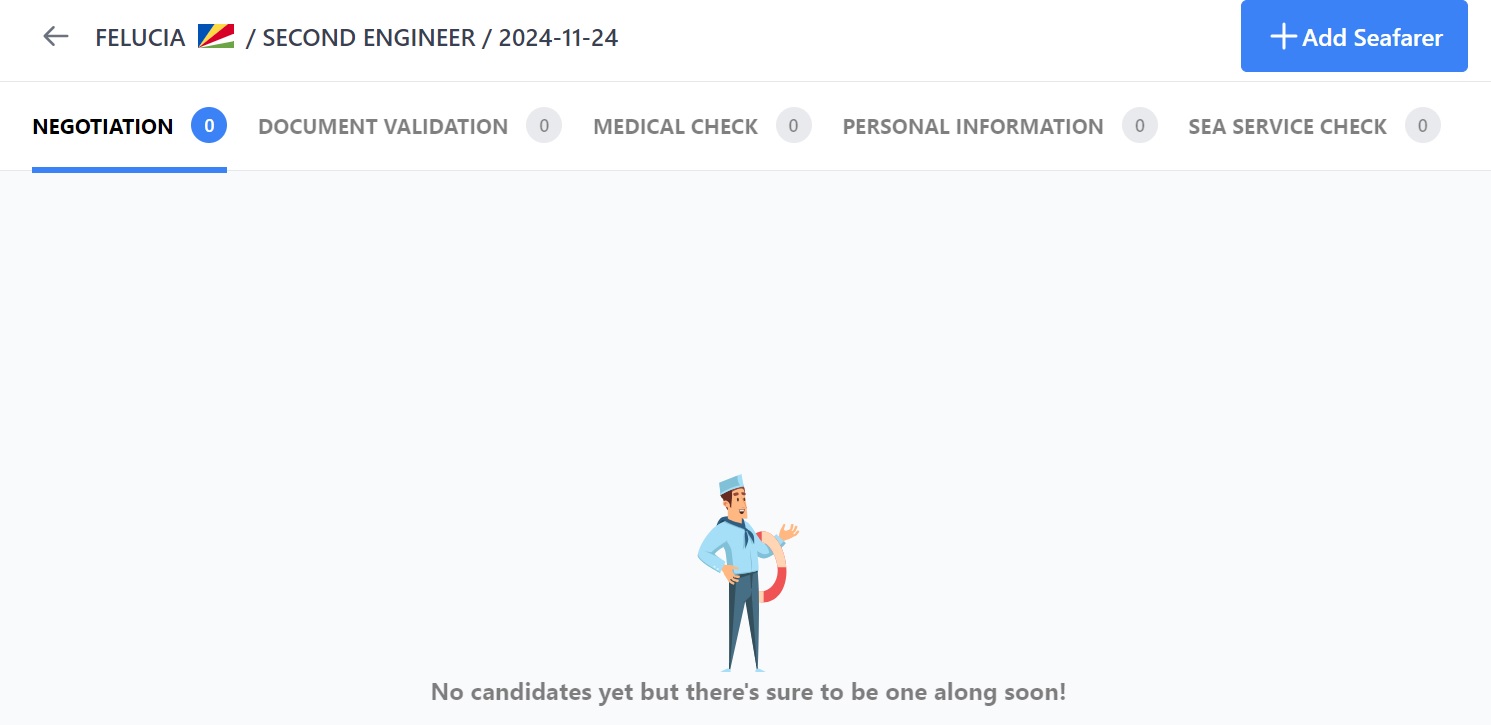
You will then go to this page - this is the Jobs Details page, If there are no candidates yet, the page looks like this:

Screenshot of Martide's maritime recruitment and maritime crew management system software

If there are candidates, the page looks like this:

Image

Here you can:

  • See the rank / vessel / contract details on the left
  • See the names of potential candidates, their rank, name, availability, master status, whether they have their documents in order and client status.
  • Apply the candidate to that Assignment by clicking the Apply button to the far right of their profile. 
  • Add a candidate to the Assignment by clicking the click here text if there aren't any candidates showing.
  • Filter the candidates by General, Location, Personal, Employment & Work History, Medical, Documents, Status and Planning by clicking the boxes at the top.

When you click the apply button next to a candidate you will see this page:

Screenshot of Martide's maritime recruitment and maritime crew management system software

Click Next and you will see this page:

Screenshot of Martide's maritime recruitment and maritime crew management system software

Here you can:

  • Add details about the candidate's documents (type, number, country of issues and dates.)  
  • Upload a copy of the document.
  • Apply the candidate to that Assignment by clicking the Apply Seafarer button at the bottom of the page. 

When you click Apply seafarer you will see this pop-up box:

Screenshot of Martide's maritime recruitment and maritime crew management system software

If you definitely want to apply the candidate to the Assignment click the Add candidate button and you'll be taken back to the Job Detail page where you’ll see the candidate is now applied to the Assignment:

Screenshot of Martide's maritime recruitment and maritime crew management system software

How to track a candidate through the Pipeline

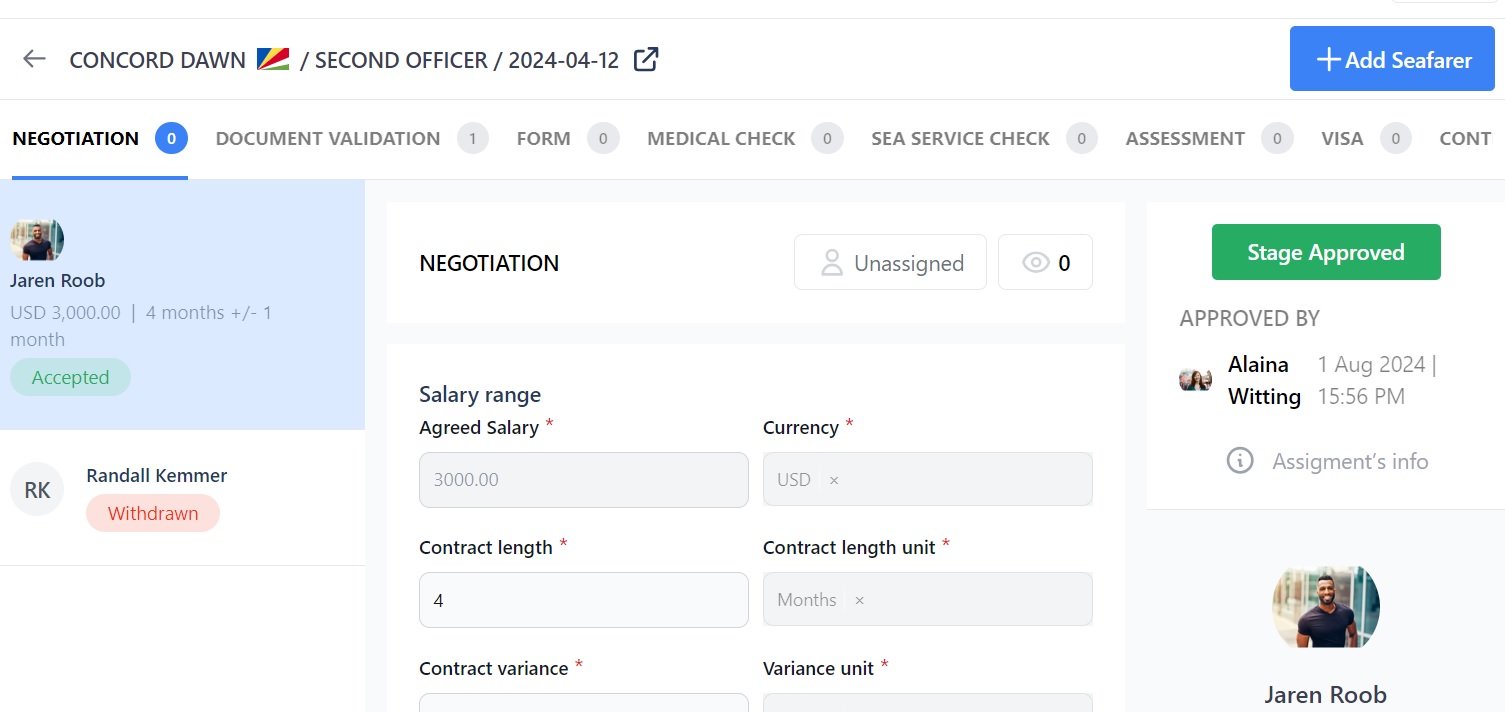
In our example we are going to approve Alfonso Tromp's Negotiation stage. Click on the stages at the top to see where your candidate is at. For example, Alfonso has now moved to the Document Validation stage:

Screenshot of Martide's maritime recruitment and maritime crew management system software

Here you can:

  • See the stage of the Pipeline that this candidate is at.
  • See who that stage has been assigned to and who is watching it (if anyone.)
  • Click on any of the headings: Negotiation, English Test, Medical Check, Visa etc. to see which candidates are at that stage.
  • Approve or reject a candidate at any stage.
  • Add another/more candidates.

Our example candidate, Alfonso's documents have been validated so we're going to approve this stage of the Pipeline.  

Click Save when you're done and then click on the next stage in your Pipeline. In our example, it's Medical Check:

Screenshot of Martide's maritime recruitment and maritime crew management system software

In our example, Alfonso passed his medical so we're going to approve him. You can then click on the next stage of the Pipeline.

Continue like this until you've completed all the stages in your Pipeline and you've either hired or rejected the candidate.  

Why is there a missing interview stage in an Assignment?

Firstly, check the Pipeline's Settings to see if the interview stage has been created. Secondly, create a new Assignment because Pipeline changes are not reflected in Assignments or Recruitments that have already been created.

How to transfer a candidate to another Assignment

Crew managers can transfer certain Pipeline Stages from one Assignment to another. This is useful if a candidate needs to change vessels and they are halfway through the Pipeline for a different vessel. It means you don't have to repeat all the Stages again for the new Assignment.

The system will automatically transfer Negotiations, Assessments (if the same type is required) and Forms (if the same Form template is used.) You will be able to see which Stages will be transferred and which will not.

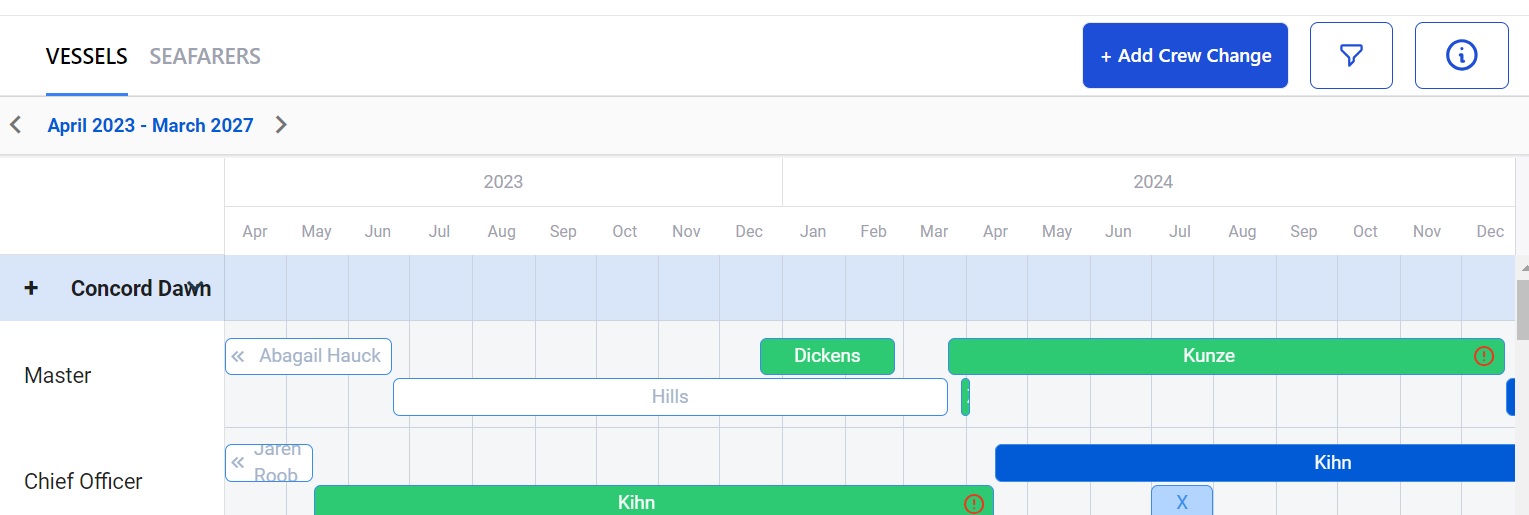
To transfer Pipeline Stages, go to Planning in the column on the left hand side of the main menu. That will take you to this page:

Image

Use the filters to find the vessel that you want to transfer the Pipeline Stages from. For example we want to transfer Alfonso who has applied for a job on the vessel Aqua, so we've searched for Aqua and found the planning schedule and can see our 3 candidates from above:

Screenshot of Martide's maritime recruitment and maritime crew management system software

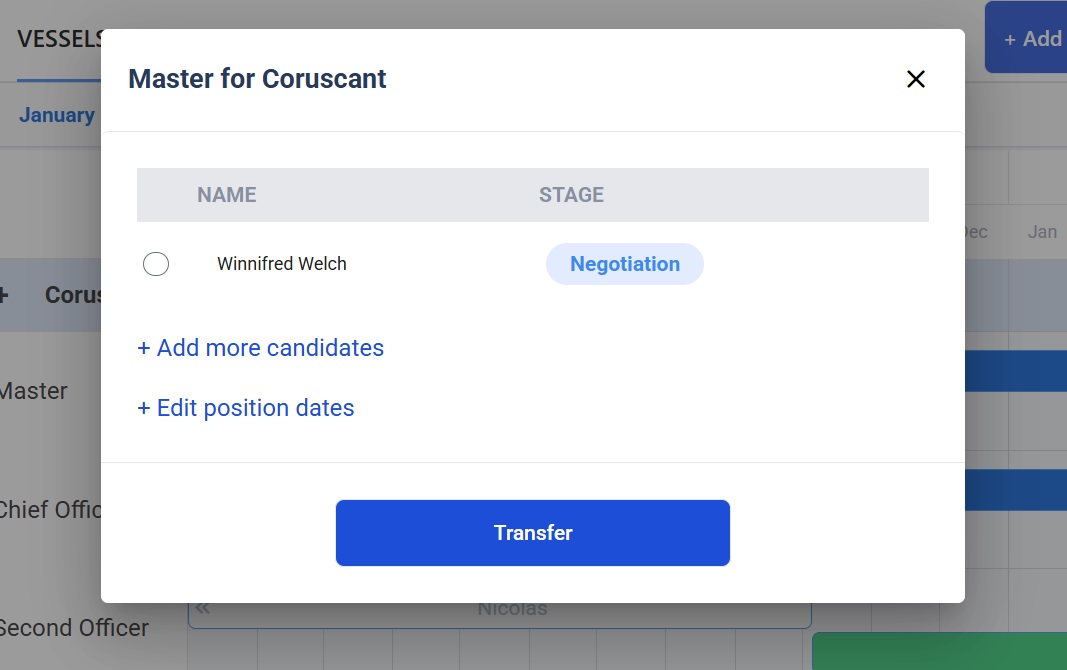
Double click on the blue candidate box and you will see this:

Screenshot of Martide's maritime recruitment and maritime crew management system software

Here you can:

  • See what Stages the Candidates are at.
  • Add more candidates.
  • Update the dates of the Assignment.
  • Click the box next to the candidate to transfer them, then click Transfer. You will see this:
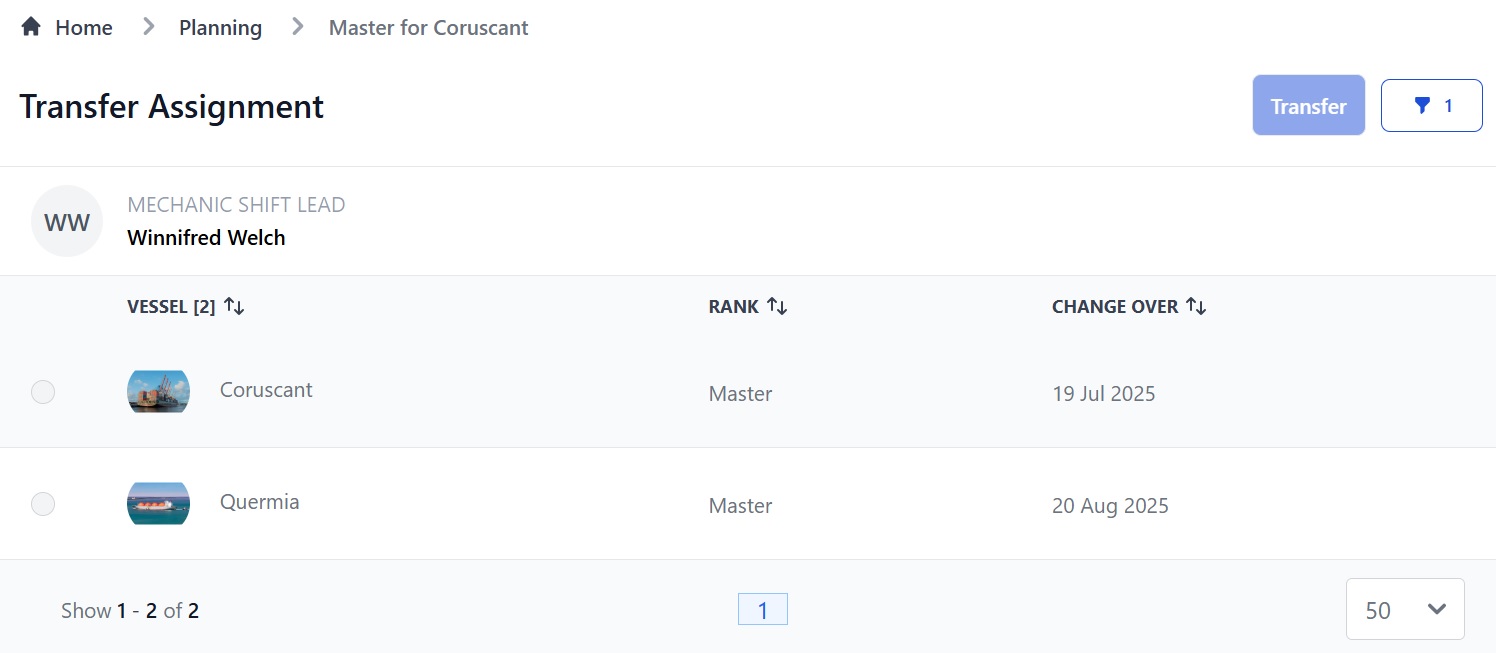
Screenshot of Martide's maritime recruitment and maritime crew management system software

Here you can:

  • Choose one or more ranks to transfer the candidate to.
  • Choose one or more vessels to transfer the candidate to.
  • Click the box next to an Assignment to transfer the candidate.

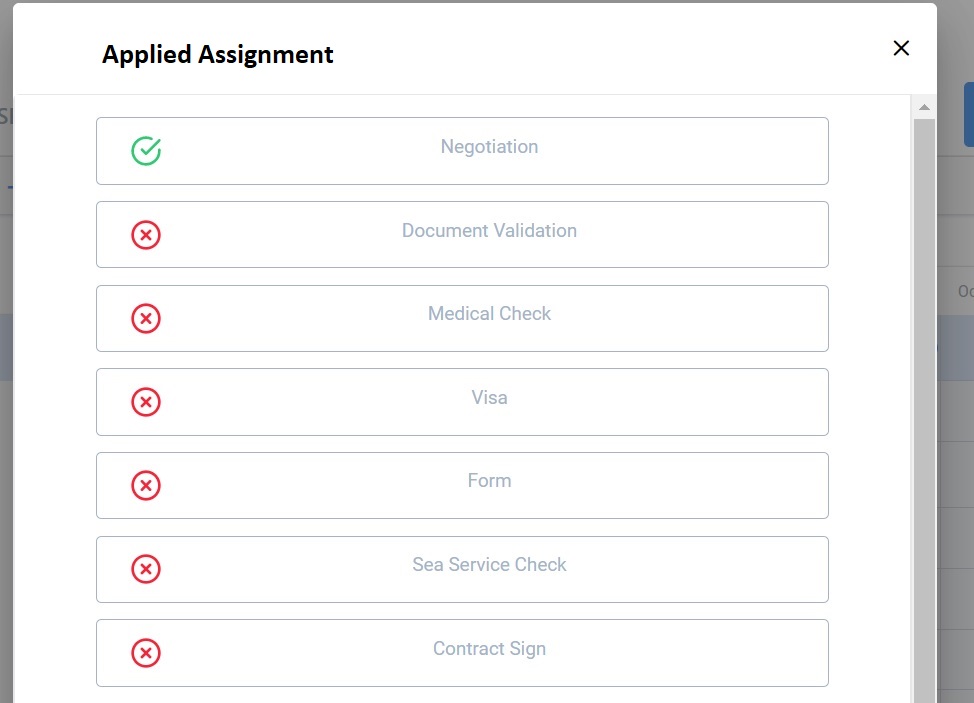
We are going to transfer Alfonso to a different vessel/Assignment. When you transfer a candidate you will then see this:

Image

Any Stages that have already been approved and can be automatically transferred will have a green check mark next to them.

We’ve kept our example simple, but in reality you will normally have more green check marks and approved Stages.

To transfer your seafarer candidate from one vessel’s Assignment to another click the Transfer button at the bottom of the pop-up box:

Screenshot of Martide's maritime recruitment and maritime crew management system software

You will be returned to the main Planning page where you will see a notification telling you the Planning has been transferred:

Screenshot of Martide's maritime recruitment and maritime crew management system software

How to edit or delete an Assignment

Only crew managers can edit or delete an Assignment. To do so, go back to the main Assignments page:

Screenshot of Martide's maritime recruitment and maritime crew management system software

Here you can:

  • Edit an Assignment by clicking the pen icon (see above.)
  • Delete an Assignment by clicking the trash can icon (see above.)

When you edit an Assignment you will go back to the same page as when you created it. You can change anything you need to.

How to close an Assignment

As a crew manager, if you have filled the position and want to close the Assignment, go to the main Assignment page and click the blue Open box next to an Assignment:

Screenshot of Martide's maritime recruitment and maritime crew management system software

This will show you a drop down option to close the Assignment:

Screenshot of Martide's maritime recruitment and maritime crew management system software

If you click on Closed you will get a warning asking if you're sure. If you are, click Closed. The Assignment status will now appear as Closed:

Screenshot of Martide's maritime recruitment and maritime crew management system software

You can re-open the Assignment by clicking on Open.

How to sort your Assignments

Sorting makes it easier to manage your Assignments. Here's how to do it.

You can sort your Assignments by Vessel, Rank, Hired, Change Over and Status. Sorting is A-Z or Z-A or 0-9 or 9-0. Click the 3 lines next to the headings to rearrange them:

Screenshot of Martide's maritime recruitment and maritime crew management system software

How to filter your Assignments

If you have a lot of Assignments, filtering helps you find the one you need.

You can filter your Assignments by Vessel, Seafarer Rank, Change Over, Status, Applied Candidates, Advertising Agent and Visibility:

Screenshot of Martide's maritime recruitment and maritime crew management system software

When you click on any of the boxes above you will see a drop down menu that lets you create a filter. For example, if you click on the Seafarer Rank box you will see this:

Screenshot of Martide's maritime recruitment and maritime crew management system software

Now you can filter by rank.

To remove the filters, click the blue Filter button in the top right corner. It will turn white and the filter options will disappear:

Screenshot of Martide's maritime recruitment and maritime crew management system software

To get the filters back, click on the Filter button again.

To learn more about managing your candidates, take a look at this guide here. To learn more about the Seafarers page, click here. To see a quicker guide to simply creating a job vacancy, click here.

A note about assigned users and watchers

If you are a crew manager and you create an Assignment, you are a Watcher by default. The person who you assign a Pipeline Stage to may be a User It could be one of your company's users or it could be  manning agent for example. ) As an assigned person they will need to take action.

Or they may be a Watcher. This means they will just be kept up-to-date but don't have to do anything. When a Stage is assigned to someone, they will get a Notification and if they need to take action, it will be added to their My Tasks page.

We hope you've found this guide helpful but if you need any additional help or if you experience any technical difficulties please get in touch with us here.