Martide's User Groups Make Maritime Recruitment Easier

We know that maritime recruitment can be stressful and that as a shipowner, crew manager or a manning agent, you are constantly striving to fill your seafarer jobs.
And it can be hard to keep on top of every applicant that expresses interest in your vacancies! Plus you’re also really busy with a thousand other things which means it would be really handy to be able to delegate.
That’s precisely why we created the User Groups function to Martide’s maritime recruitment and crewing system software.
User Groups let you add teams or departments from your company to our system and then set permissions so you can customize what the people you have added to the group can do in the backend of the Martide website.
It's all about sharing the workload and making sure that your team, and your company, are all rowing in the same direction, so to speak!
Read more: New Martide Feature: Vessel Custom Contacts
In this blog post we’ll take a closer look at what User Groups are, how to create one and how to make managing candidates and crew quicker and simpler!
How to use Martide's User Groups function for easier maritime recruitment
The User Groups features allow the team members in that group to keep track of your seafarer hiring process so that the likelihood of you missing that ideal applicant are vastly reduced.
Email notifications are sent to the relevant people when a candidate reaches different stages of the maritime recruitment pipeline. For example, when they reach negotiation, documentation validation, contract signing etc.
That means you and your team won’t miss important stages of the recruitment process and you won’t let skilled seafarers slip through your net!
By the way, you can also find more straightforward step-by-step instructions about creating and using User Groups on our support website which we’ve created for shipowners, crew managers and manning agents who have a Martide account.
Tip: in order to create User Groups you need to add Users to populate them first. It’s really quick and easy to do this and our step by step guide to Users will tell you exactly how to do that.
To get started, log in to your Martide account. Click on Settings in the drop down menu under your profile picture and name at the top of the page on the right hand side, and then on User Groups.
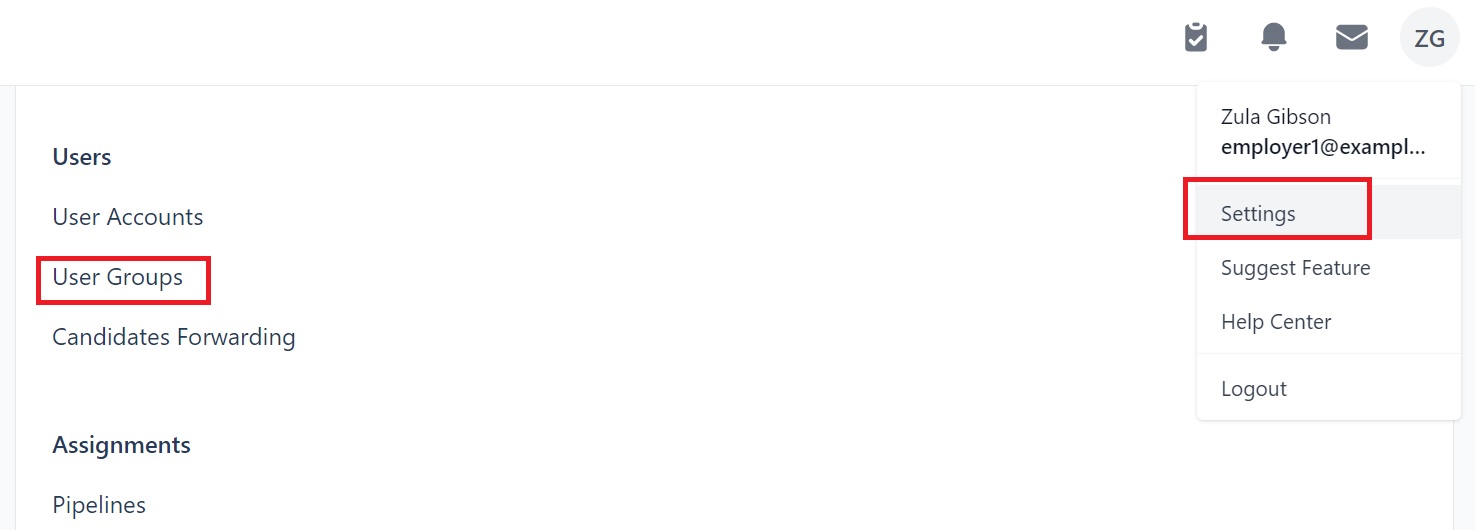
That will then take you to this page:
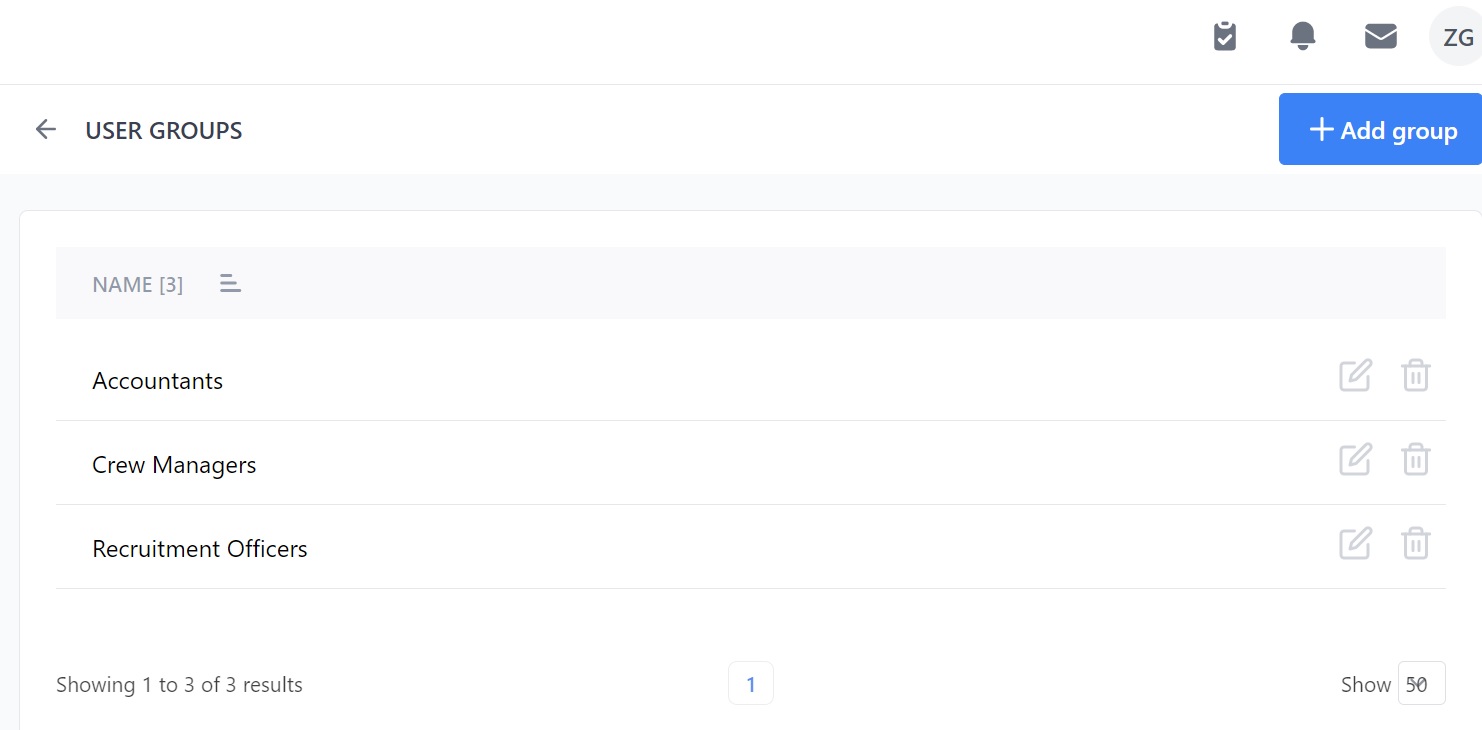
In our example we've already added three User Groups: one for our Accounts Department, one for our Crew Management Department and one for our Recruitment Team. Your page will be empty at first but it's quick and simple to add new groups of your own.
This page is also where you can edit and delete current User Groups as well as filter groups by A through Z and Z through A by clicking the three little lines next to where it says Name. Let's dive in and take a closer look.
How to create a new User Group
To create a new User Group click the blue +Add group button on the top right of the page (see the image above.) You will then be taken to this page:
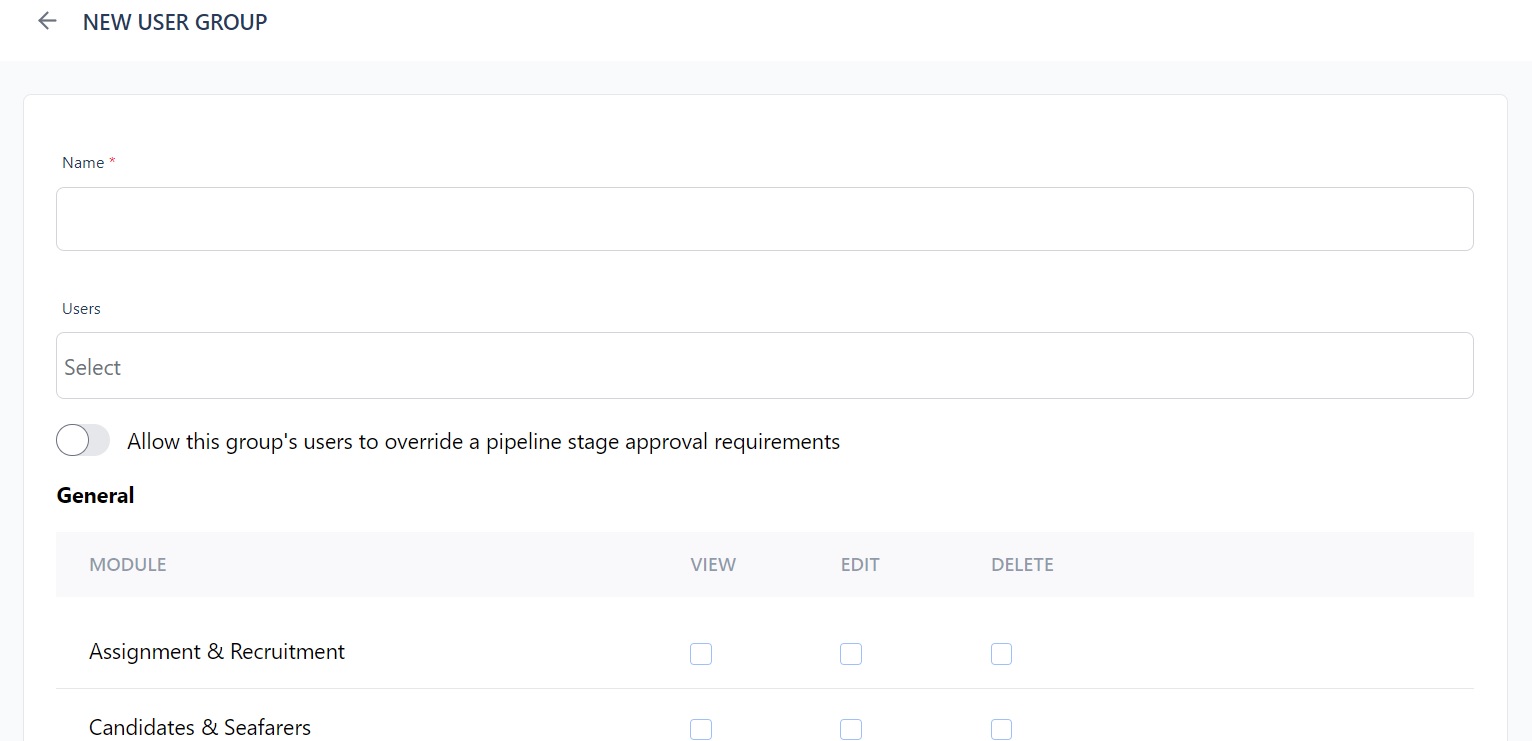
This is where you can name your group. For example you might want to name it after the rank and position a team/group is trying to fill - i.e. Chief Officer or Second Engineer, or you might want to call it after one of your own teams, for example Human Resources, Accounting or Crew Operations.
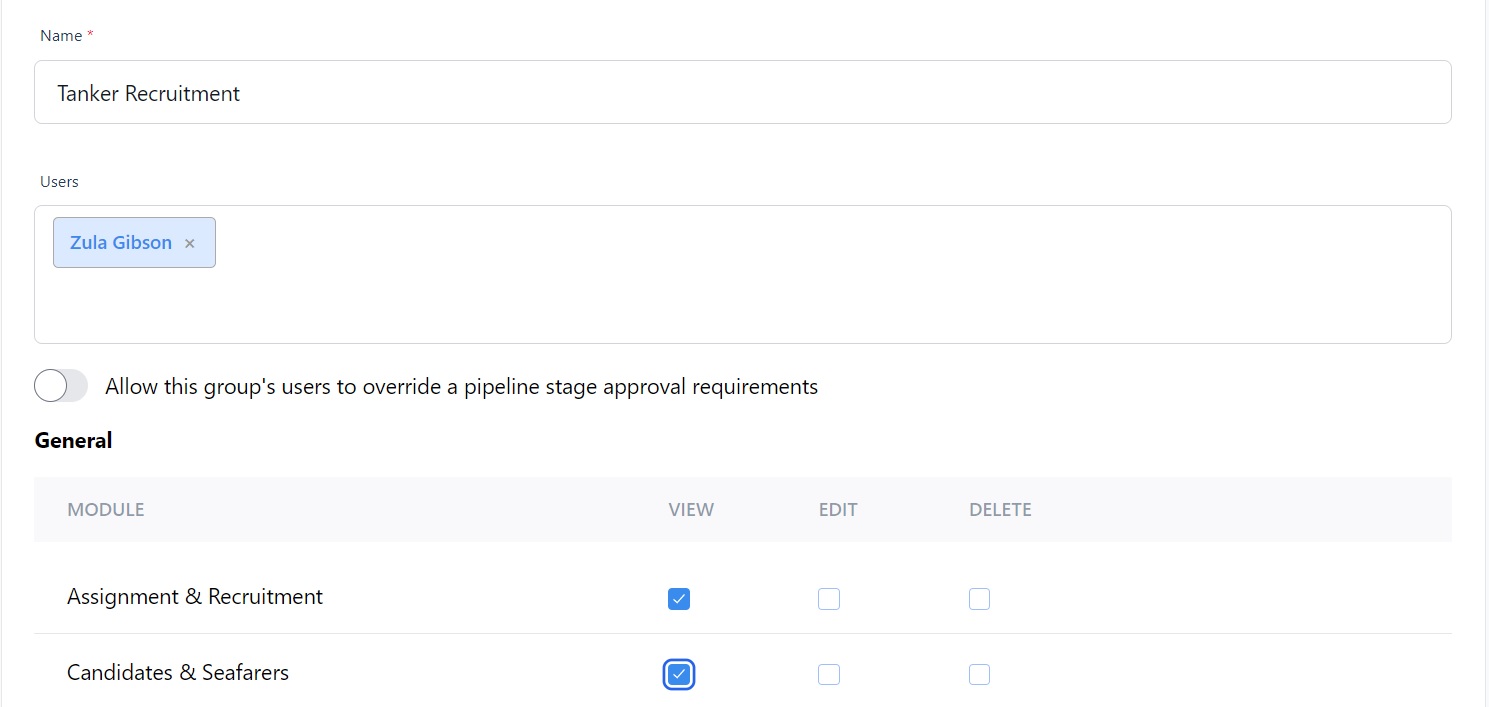
Next add your User(s) to the group and then click the check boxes to set permissions to give the coworkers you’ve added the rights to View, Edit or Delete the various features and functions within Martide's platform.
That will look something like this:
Understanding the Pipeline Approval Button
You’ll see in the image below that beneath the names of the group’s Users there is a box for Pipeline Approval which says Allow this group’s users to override a pipeline stage approval requirements.
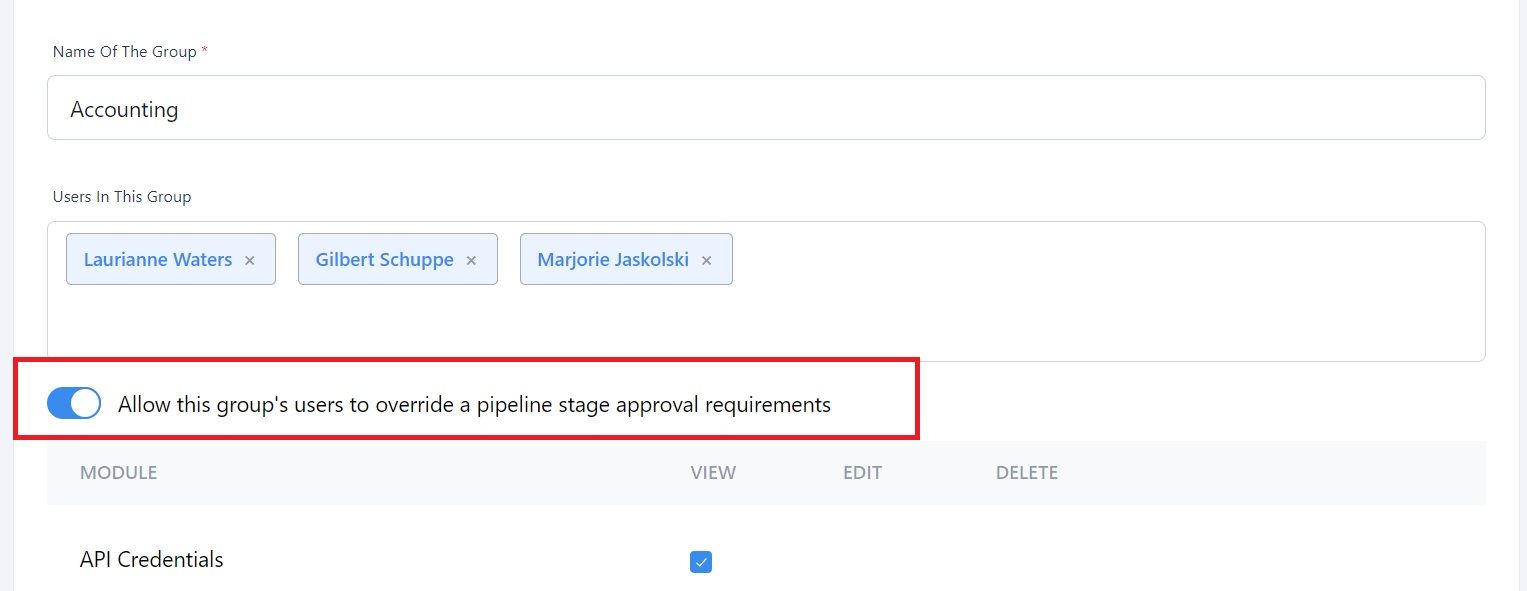
If you slide the button to the left across so it shows blue, the users in this group will be able to Override an Approval stage in a Pipeline to let a candidate move to the next stage, even if all the required information hasn’t been entered.
You can learn more about this and other aspects of maritime recruitment pipelines in Martide in this blog post here: A Shipowner's Guide to Maritime Recruitment Pipelines.
Editing and deleting existing User Groups
It’s easy to edit an existing User Group if something has changed, for example either within your shipping company or manning agency, with your users, or with one of your maritime recruitment processes or pipelines.
Go to the main User Groups page and find the User Group you want to change. To edit a group click the little pen icon next to the group you want to amend:
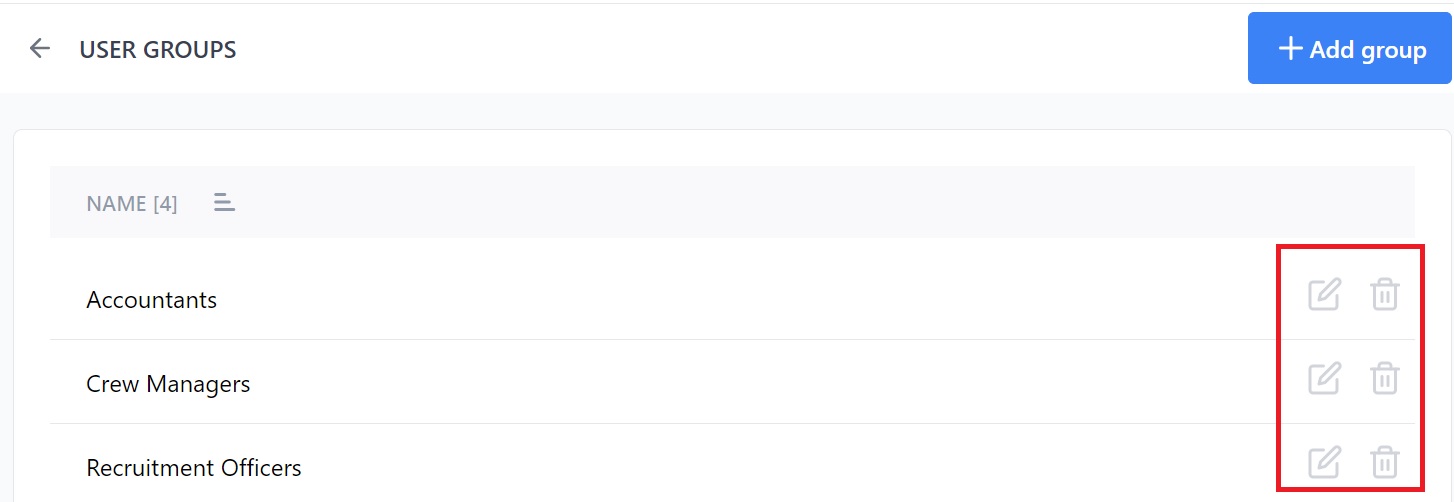
Once you’ve clicked that, you’ll see a page that’s basically the same as when you created a new group and this is where you can do everything from changing the User Group’s name, adding or deleting users, turning on or off the Pipeline Override settings and changing the permissions for that group.
To delete a User Group, go to the main User Group page and click the little trash can icon next to the entry you want to remove - see above. You will be shown a warning asking you if you really want to delete the Group. Click OK to delete or Cancel to return to the page.
Tip: The User Group should be selected when you create the Interview Stage or Approval Step in the Recruitment Pipeline.
We hope you’ve found this guide to using User Groups useful. We have a whole website of support guides that explain the different functions in our maritime recruitment and crew planning software system that we hope will be of help.
For example, if you're just getting started when it comes to using Martide or have new employees to train, why not take a look at how to fill out your candidate database or find out how to create a job vacancy?
(And while we’re talking about maritime job vacancies - did you know that you can create them quickly - and for FREE - on Martide? Get started here.)
Meanwhile, if you'd like to know more about adding clients if you offer crew management services to third parties, how to attract skilled candidates to your seafarer jobs through our mobile app, or managing your interviews, get in touch with us today.
We look forward to hearing how we can help you. Meanwhile, why not follow us on Facebook, LinkedIn and Twitter / X too?
This blog post was originally published on October 4th 2019 and updated to reflect changes and upgrades within our platform on April 25th 2023.

Eve Church
Eve is Martide's content writer, publishing regular posts on everything from our maritime recruitment and crew planning software to life at sea. Eve has been writing professionally for more than two decades, crafting everything from SEO-focused blog posts and website landing pages to magazine articles and corporate whitepapers.
UK
